Audio integrations
An audio source defines how a campaign's recordings enter AuditorIA. It can be an upload made from the app itself or an external platform connected by webhook, API, SFTP or another mechanism. Each source is an entry point: it drops the audio into AuditorIA and, from there, the app takes it through the corresponding flow.
Audio sources are chosen per campaign, from the Audio Sources tab. This page explains what each source means and what to check afterwards. For the campaign's overall map, see Campaign configuration.
No source audits on its own. It only makes the audio enter AuditorIA. Depending on the source, that entry can create a task directly or leave the audio/record ready for the corresponding flow.
Webhook integrations send data over the internet to your installation's External API: the service that receives those events. Its address is the External API base URL configured in /admin/settings, and it may live on a different domain than the one you use to reach the app. A localhost installation cannot receive these webhooks: the external platform needs an address reachable from the internet.
Internal
Internal is AuditorIA's native path: audio enters because someone uploads it from the app itself. It is not an integration with an external platform, so you do not need to configure a host, a webhook, an external API Key, a secret or remote credentials.
Unlike the other sources on this page, Internal does not fetch audio and does not receive it automatically. Nothing enters by itself: every call reaches AuditorIA because a person uploaded it.
Step 1 - In the campaign: choose Internal
- In the side menu, open Campaigns > Campaign configuration > Calls.
- Open the campaign you need. If it is new, save it first: the source is configured on an already saved campaign.
- Go to the Audio Sources tab.
- Choose Internal and save.
When you choose Internal, AuditorIA does not show additional connection fields. This records that the campaign works with audio uploaded from the app, and the source configuration ends here: there are no credentials to paste and no external service to keep running.
The Audio Sources tab reuses wording meant for external integrations that does not apply to Internal:
- where it says provider or receive audio automatically: for Internal there is no provider and no automation;
- the Sync active / inactive status: Internal does not sync, so that indicator does not tell you whether the campaign is correctly configured.
For Internal, the sign that everything works is that the upload finishes correctly and the task appears.
Step 2 - Upload the audio
Audio is uploaded from the Upload file screen. Choose the flow that fits your case:
- One or several separate files: Attach files in standard upload.
- Many audio files at once: Bulk upload with ZIP + CSV.
- A call split into parts: Upload a fragmented call.
Each flow is explained step by step in Upload audio. This page does not repeat them.
What to check afterwards
After you start an upload, AuditorIA creates the task and the call record, and leaves them in the normal task flow. To check it, review:
- the upload confirmation on the Upload audio screen;
- Search and work with tasks, to open the created task;
- Search audio, if you want to check whether the audio was already loaded before uploading it again.
On screen, Internal is described as "Manual file upload or internal API". That mention is not a separate path you can configure from here: it refers to the endpoints the app itself uses when you upload a file. There is no "internal API" that AuditorIA hands you to connect systems.
If what you need is for a third-party system to send audio on its own, with its own API Key, that case is External API, not Internal.
Anura
Connect your cloud PBX Anura so every call that ends with a recording enters AuditorIA automatically and is ready to audit.
How it works
When a call ends in Anura, Anura sends a notification (webhook) to AuditorIA with the call data and the link to the recording. AuditorIA validates the access key, identifies the operator, downloads the recording, creates the task and processes it. You don't have to upload anything by hand.
Before you start
- A call campaign created in AuditorIA. You'll need its identifier (
campaign_id). See Campaign configuration. - A quality scorecard linked to that campaign, so you can audit afterwards. See Quality scorecards.
- An AuditorIA API Key (the key that authenticates Anura's notification).
- Access to the Events / Webhooks configuration in your Anura account.
- Your AuditorIA external URL (see the note about the webhook address).
Step 1 - In AuditorIA: set Anura as the source
- In the side menu, open Campaigns > Campaign configuration > Calls. You'll see the campaign list: pick the one you want to integrate with Anura.
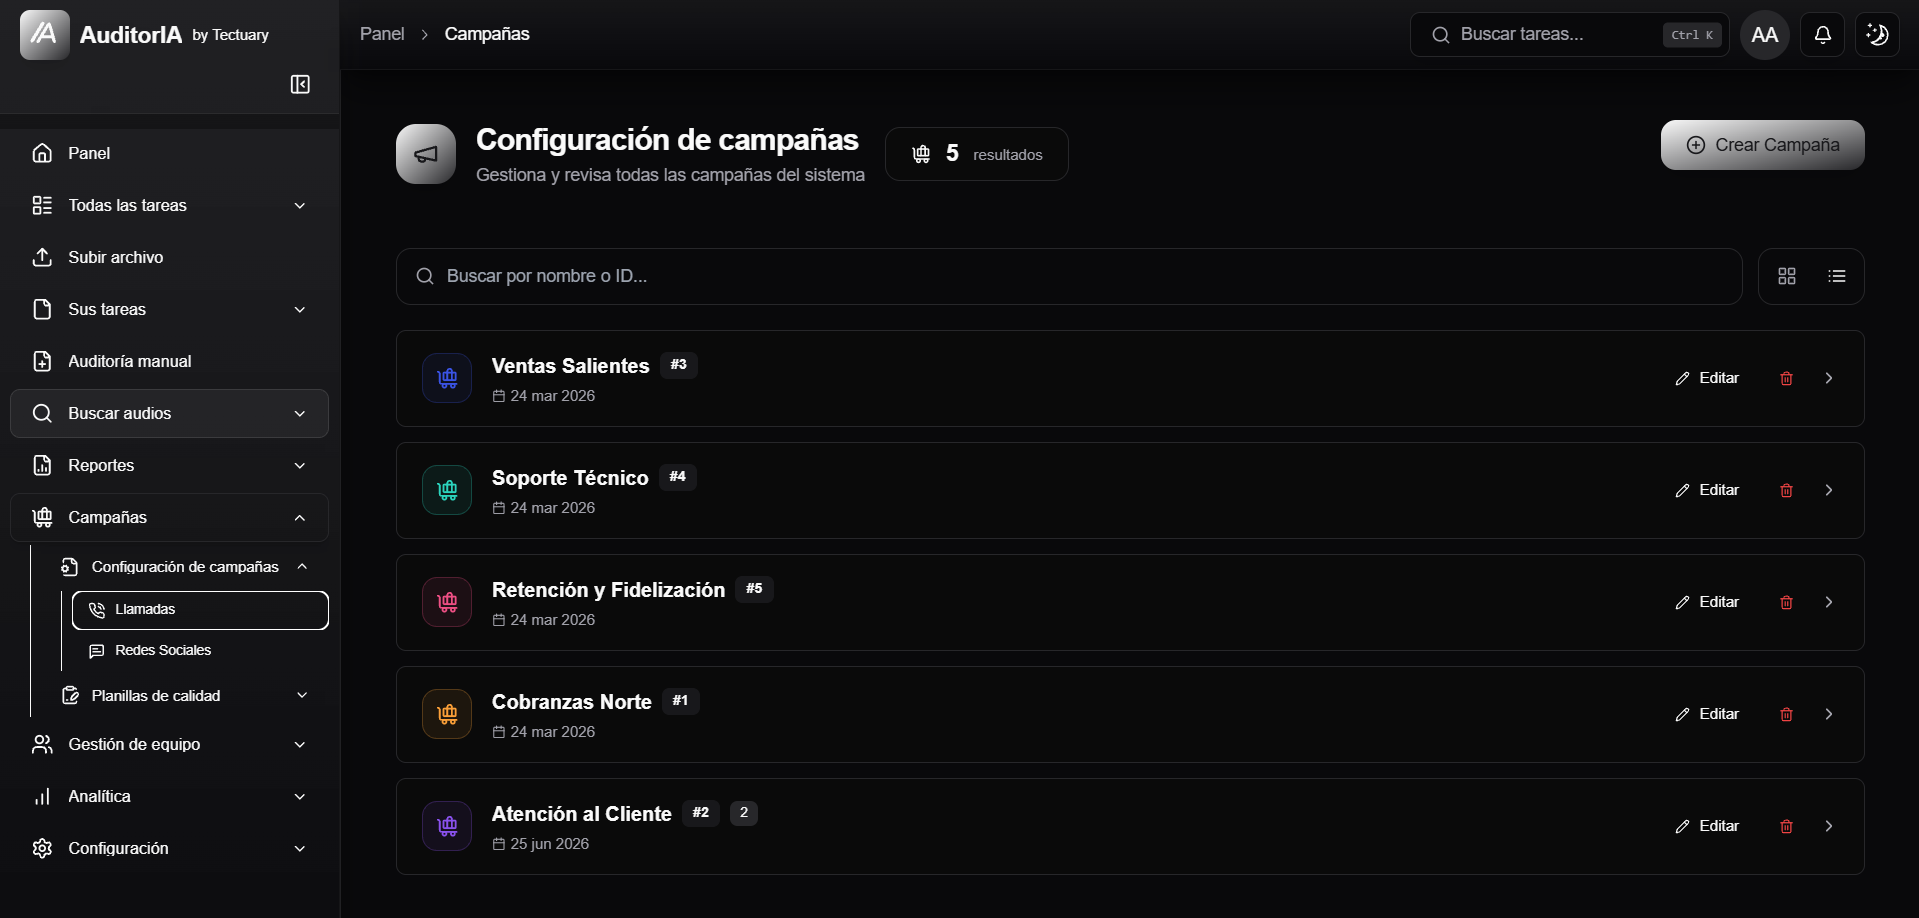
- Open the campaign (if it's new, save it first: the source is configured on an already-saved campaign) and go to the Audio Sources tab.
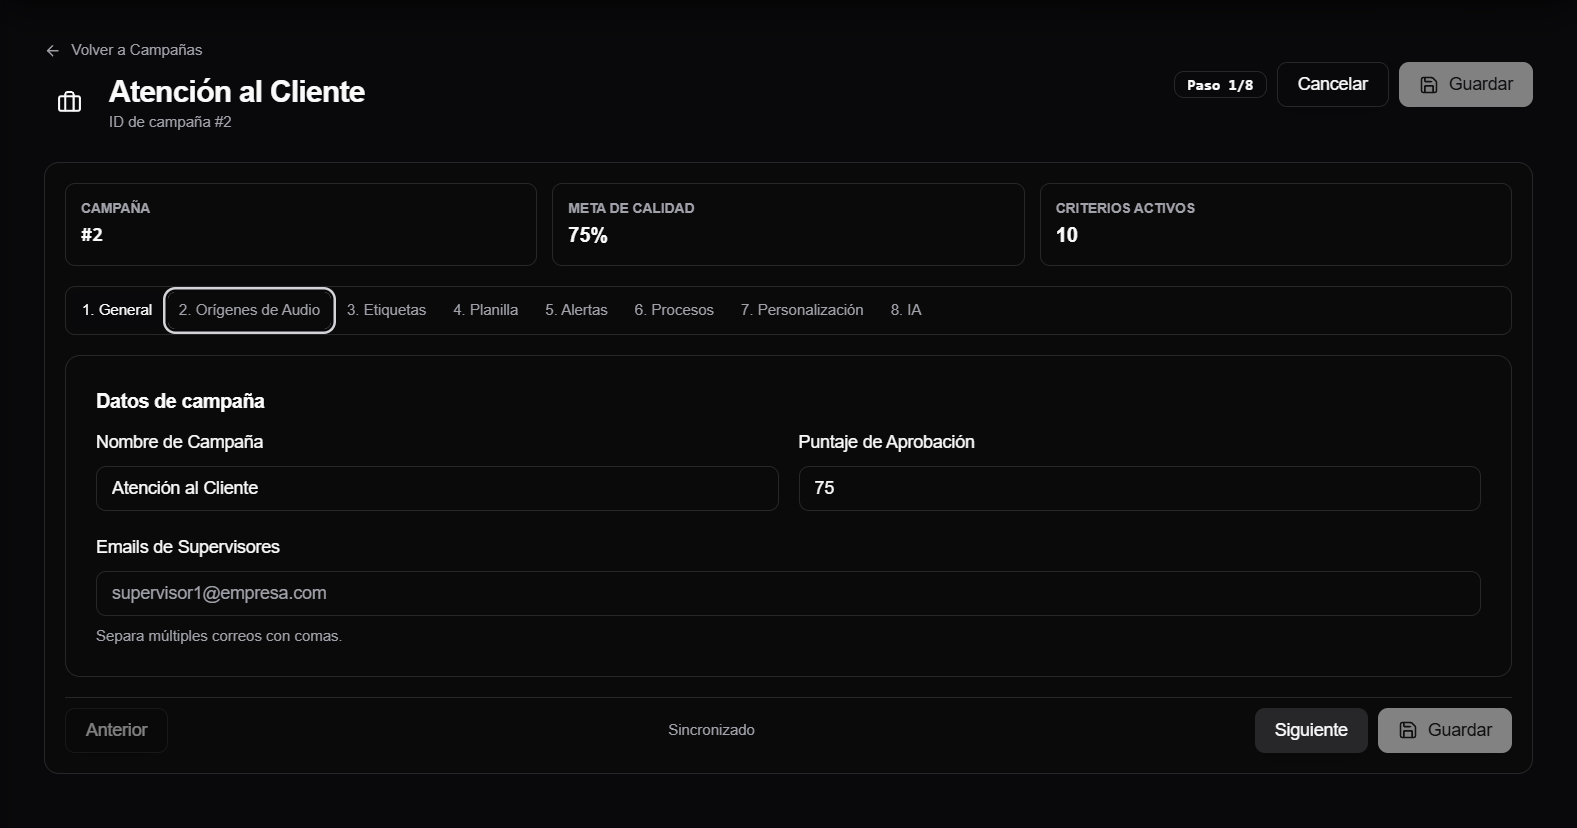
- Choose Anura and save.
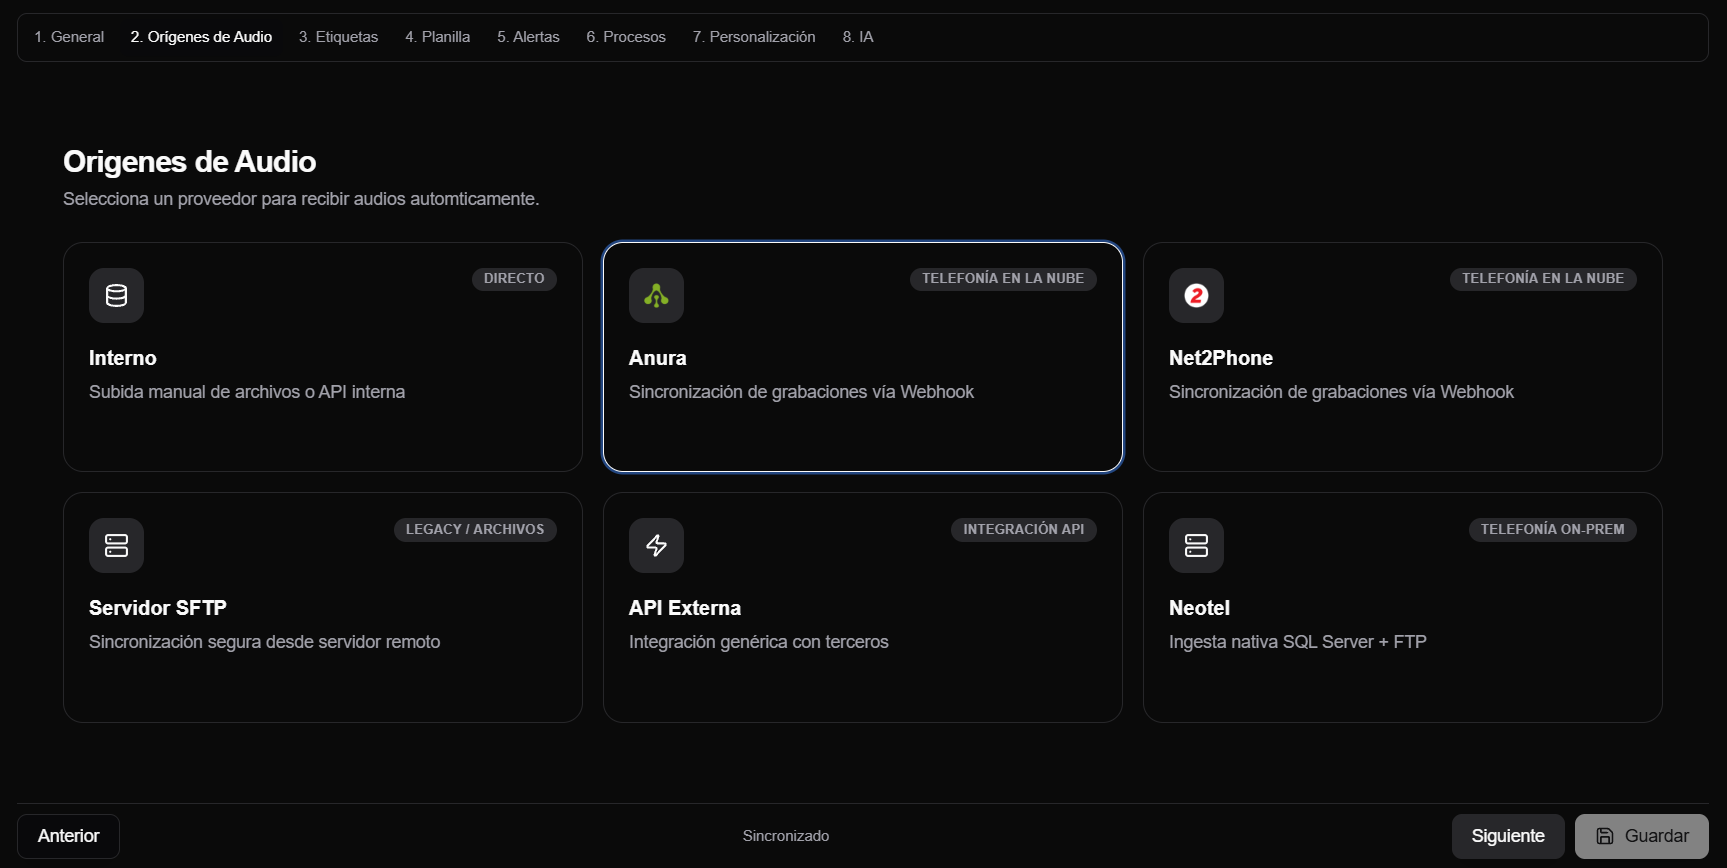
When you choose Anura, AuditorIA shows a guide with the notification format, the headers and the rules. Use it as a reference while you configure the event in Anura.
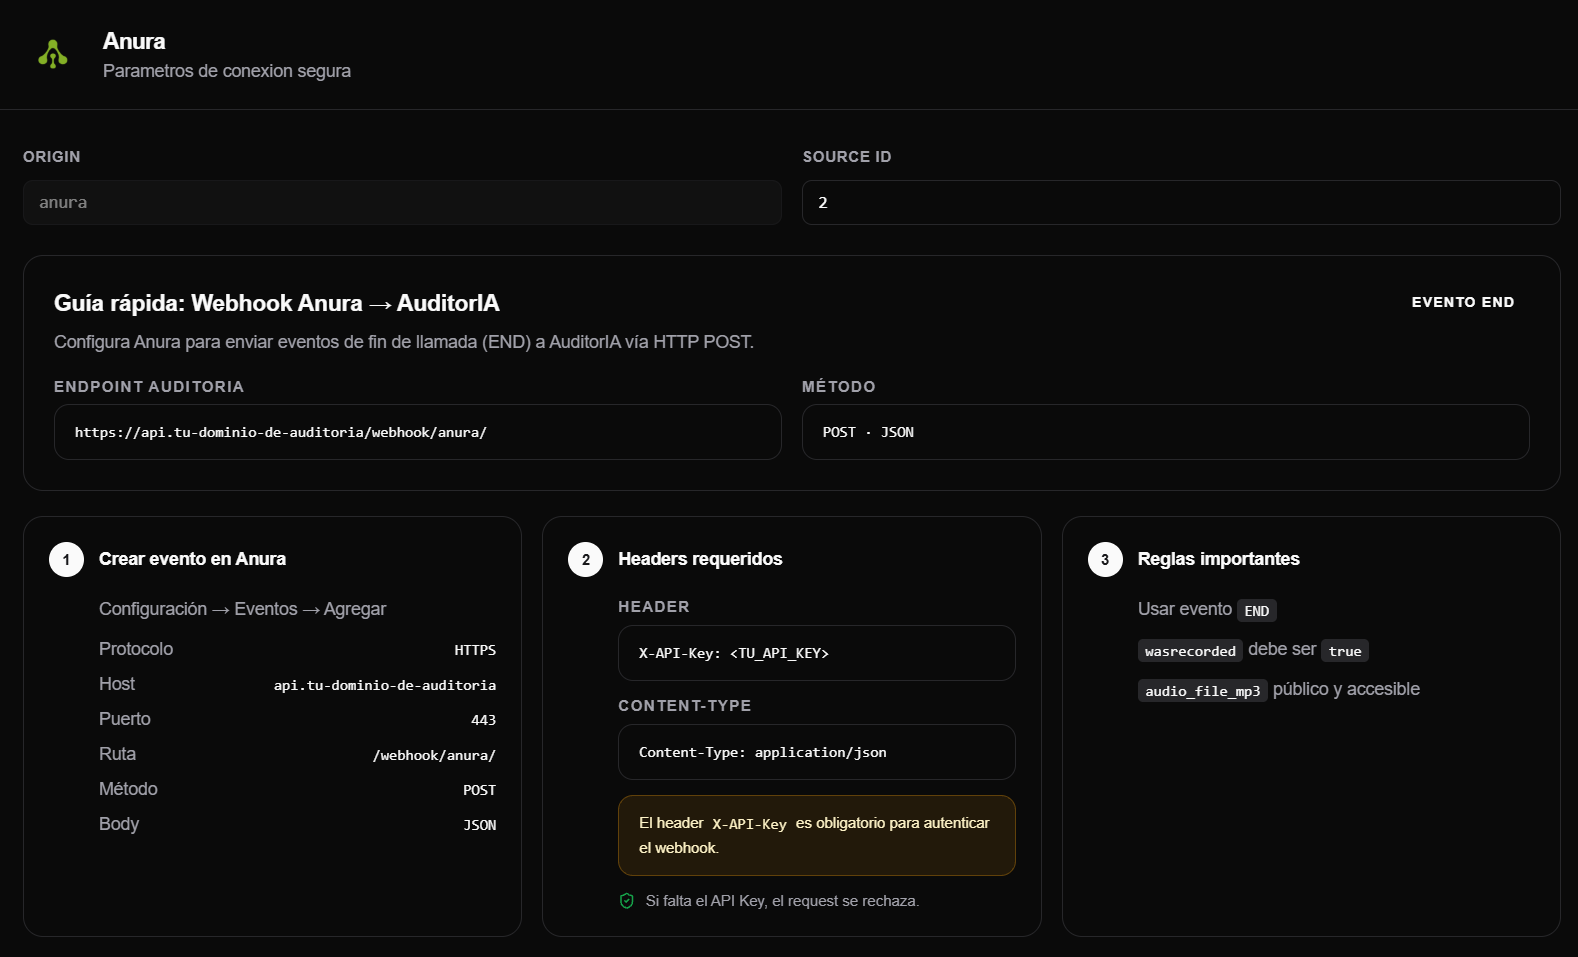
Step 2 - In AuditorIA: create the API Key
- Open Settings > API Keys (
/dashboard/settings/api-keys). - Generate an API Key and copy it. You'll use it as the
X-API-Keyheader when configuring Anura.
Store the API Key in a safe place when you create it. It's the credential that authenticates Anura's notifications against your AuditorIA.
Step 3 - In Anura: create the event
In your Anura account, create an event that notifies AuditorIA when the call ends.
- Go into the Anura panel.
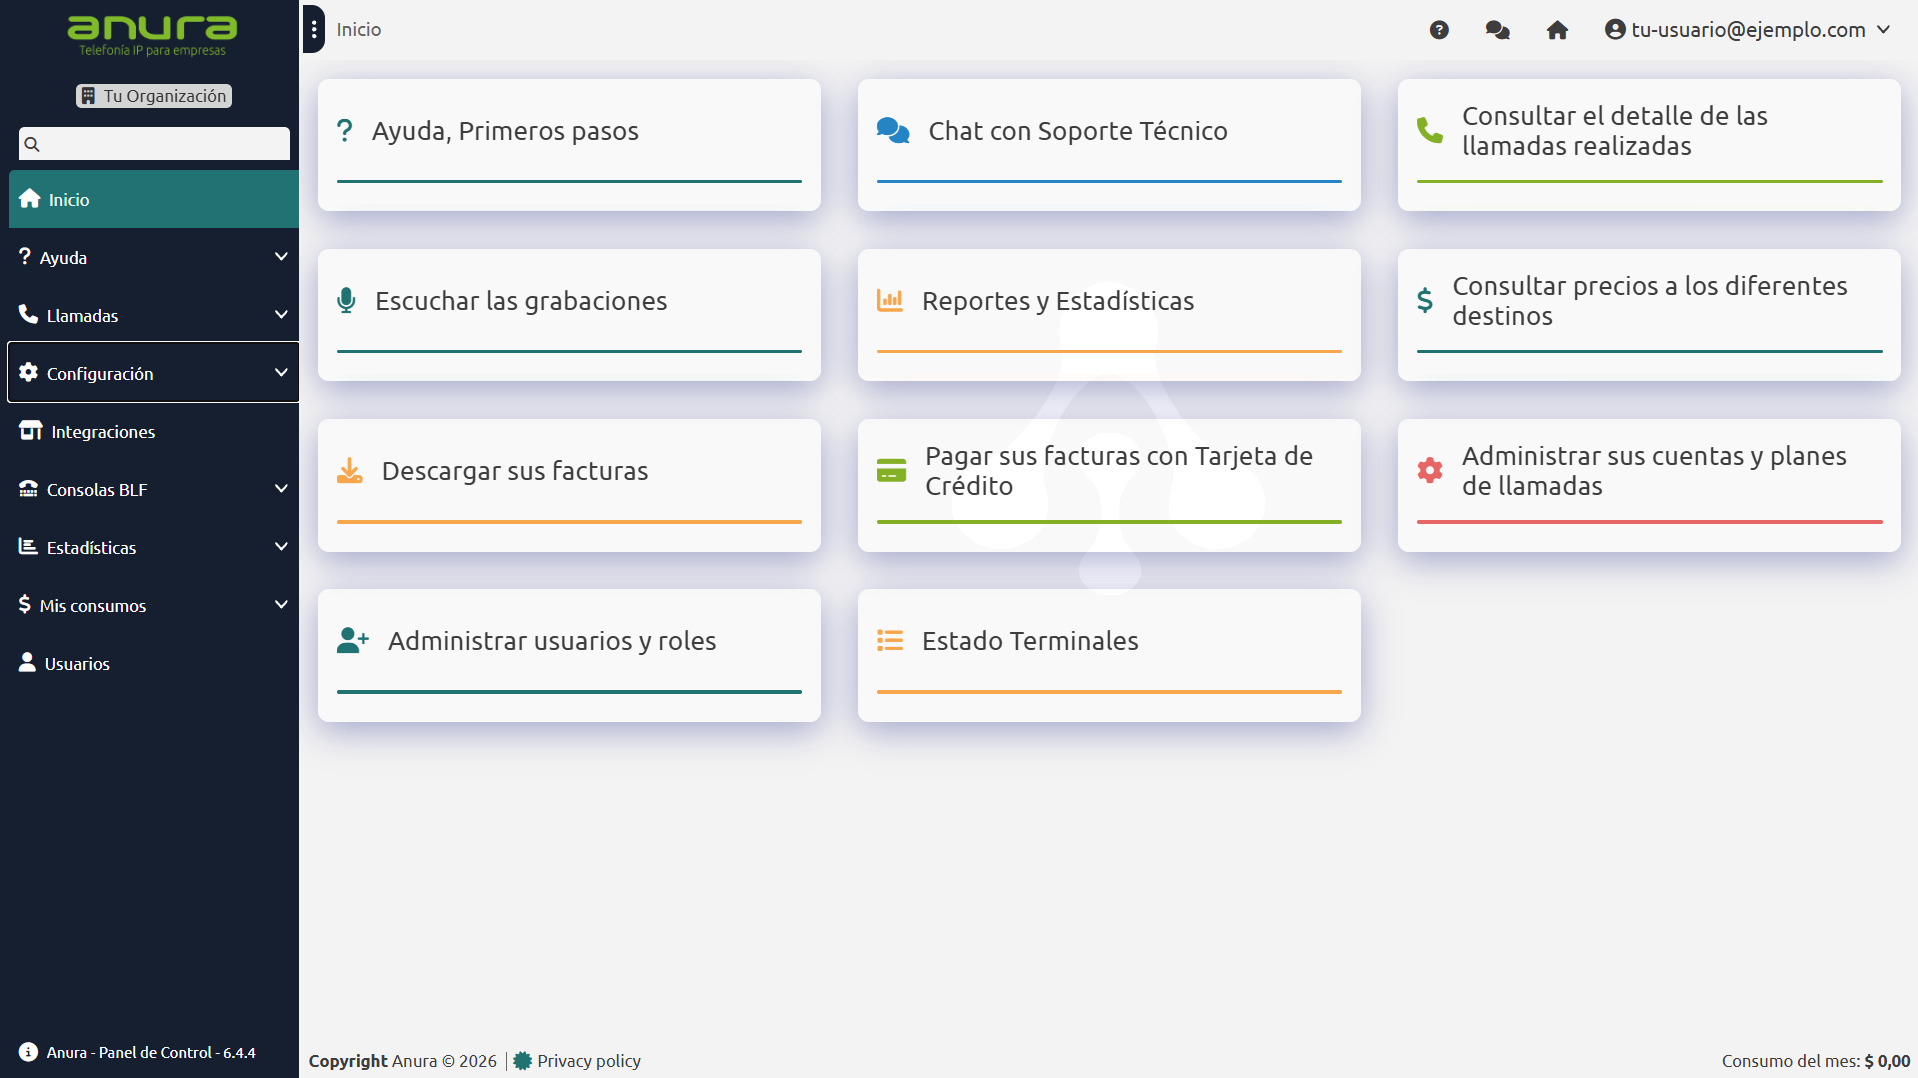
- Open Configuration > Events.
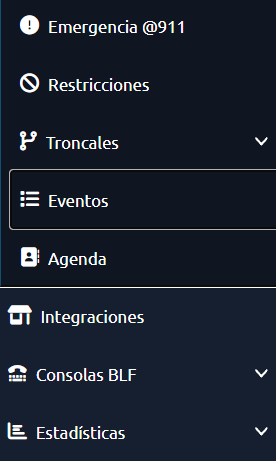
- Use Add to create a new event.
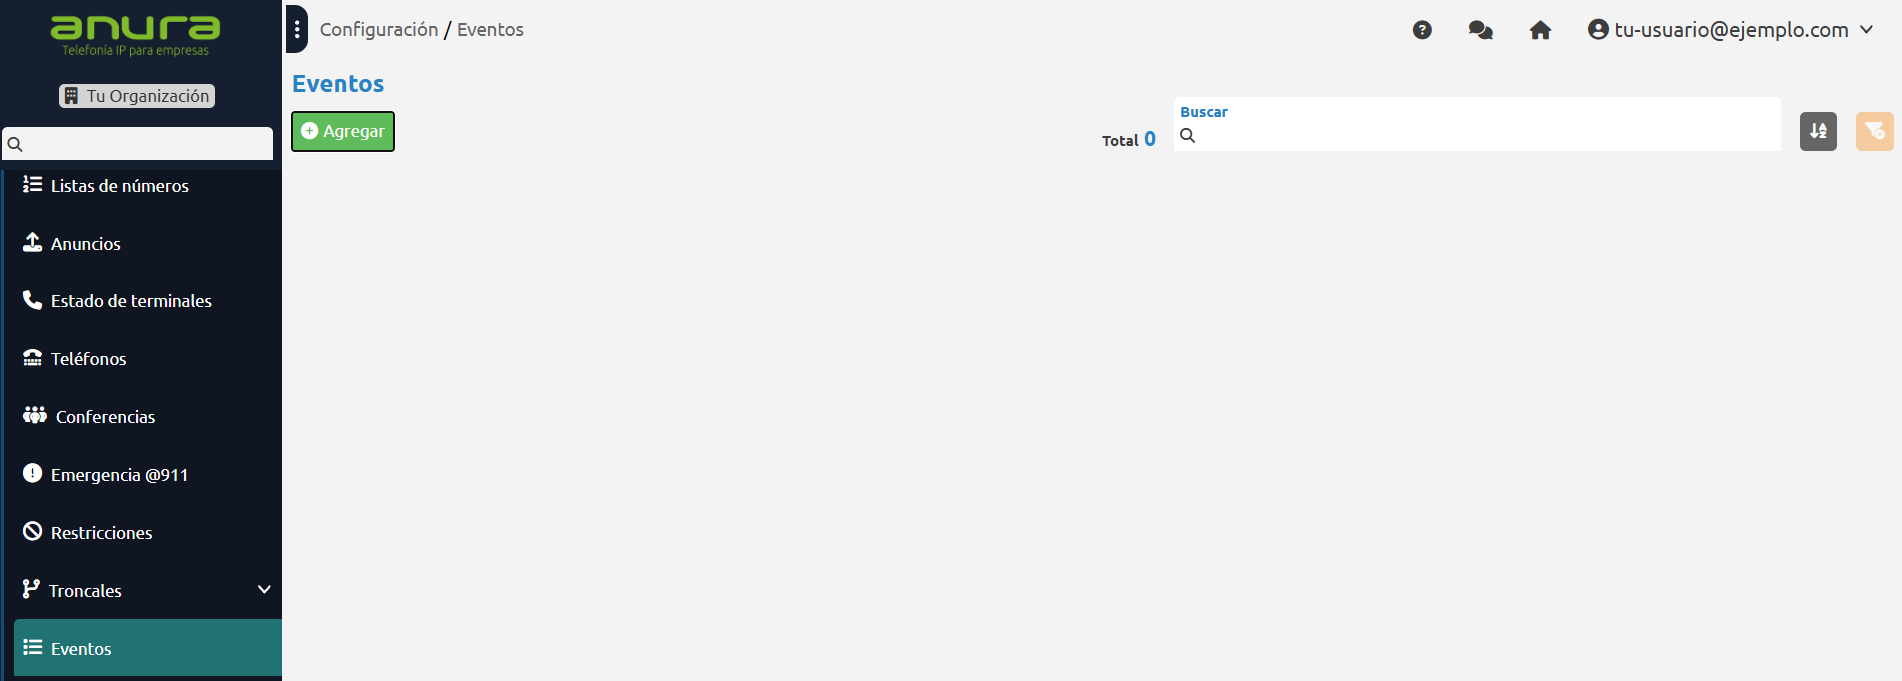
The event has three tabs: Request, Headers and Body. Complete all three.
Request
Define where and how the notification is sent.
| Field | Value |
|---|---|
| Protocol | HTTPS |
| Host | your AuditorIA public domain |
| Port | 443 |
| Path | /webhook/anura/ |
| Method | POST |
| Content type | application/json |
| Authorization | No authorization (the key goes in Headers) |
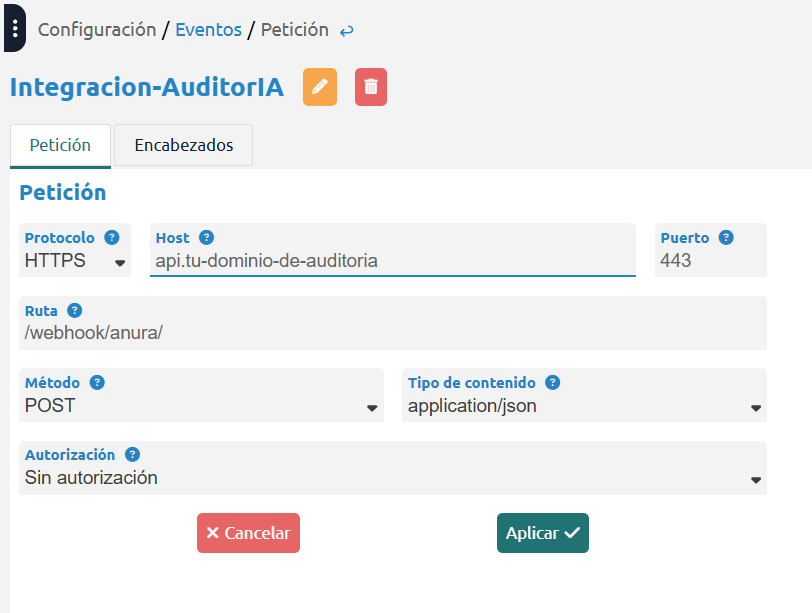
The host is the domain of your installation's External API, which is what receives Anura's notification. It's the External API base URL configured in /admin/settings, and it doesn't always match the domain you use to reach AuditorIA. If you don't know your deployment's, ask whoever administers it.
Headers
Add, as Key / Value pairs, the notification headers:
X-API-Key: the API Key you created in step 2.Content-Type:application/json.
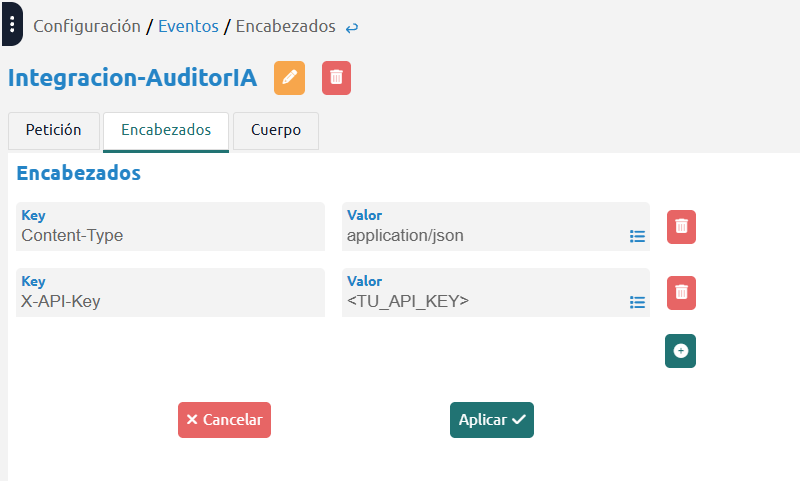
Body
The Body is the JSON that Anura will send on each call. It's built like this:
- the keys are the fields AuditorIA needs;
- the values are Anura's
{{ ... }}variables, which Anura replaces with the real data when sending; campaign_idis not a variable: it's your campaign's number in AuditorIA. You see it in the campaign header as Campaign ID #N, and it goes without quotes.
Don't include the automatic fields: cdrid is generated by AuditorIA if missing, and hooktrigger defaults to END (besides, your event already fires only on END).
Paste this JSON in the Body and replace <YOUR_CAMPAIGN_ID> with your campaign's number:
{
  "dialtime": "{{ dialtime }}",
  "direction": "{{ direction }}",
  "calling": "{{ calling }}",
  "called": "{{ called }}",
  "status": "{{ status }}",
  "duration": "{{ duration }}",
  "billseconds": "{{ billseconds }}",
  "wasrecorded": "{{ wasrecorded }}",
  "audio_file_mp3": "{{ audio_file_mp3 }}",
  "accountname": "{{ accountname }}",
  "accountextension": "{{ accountextension }}",
  "queueagentname": "{{ queueagentname }}",
  "answerterminal": "{{ answerterminal }}",
  "campaign_id": <YOUR_CAMPAIGN_ID>
}
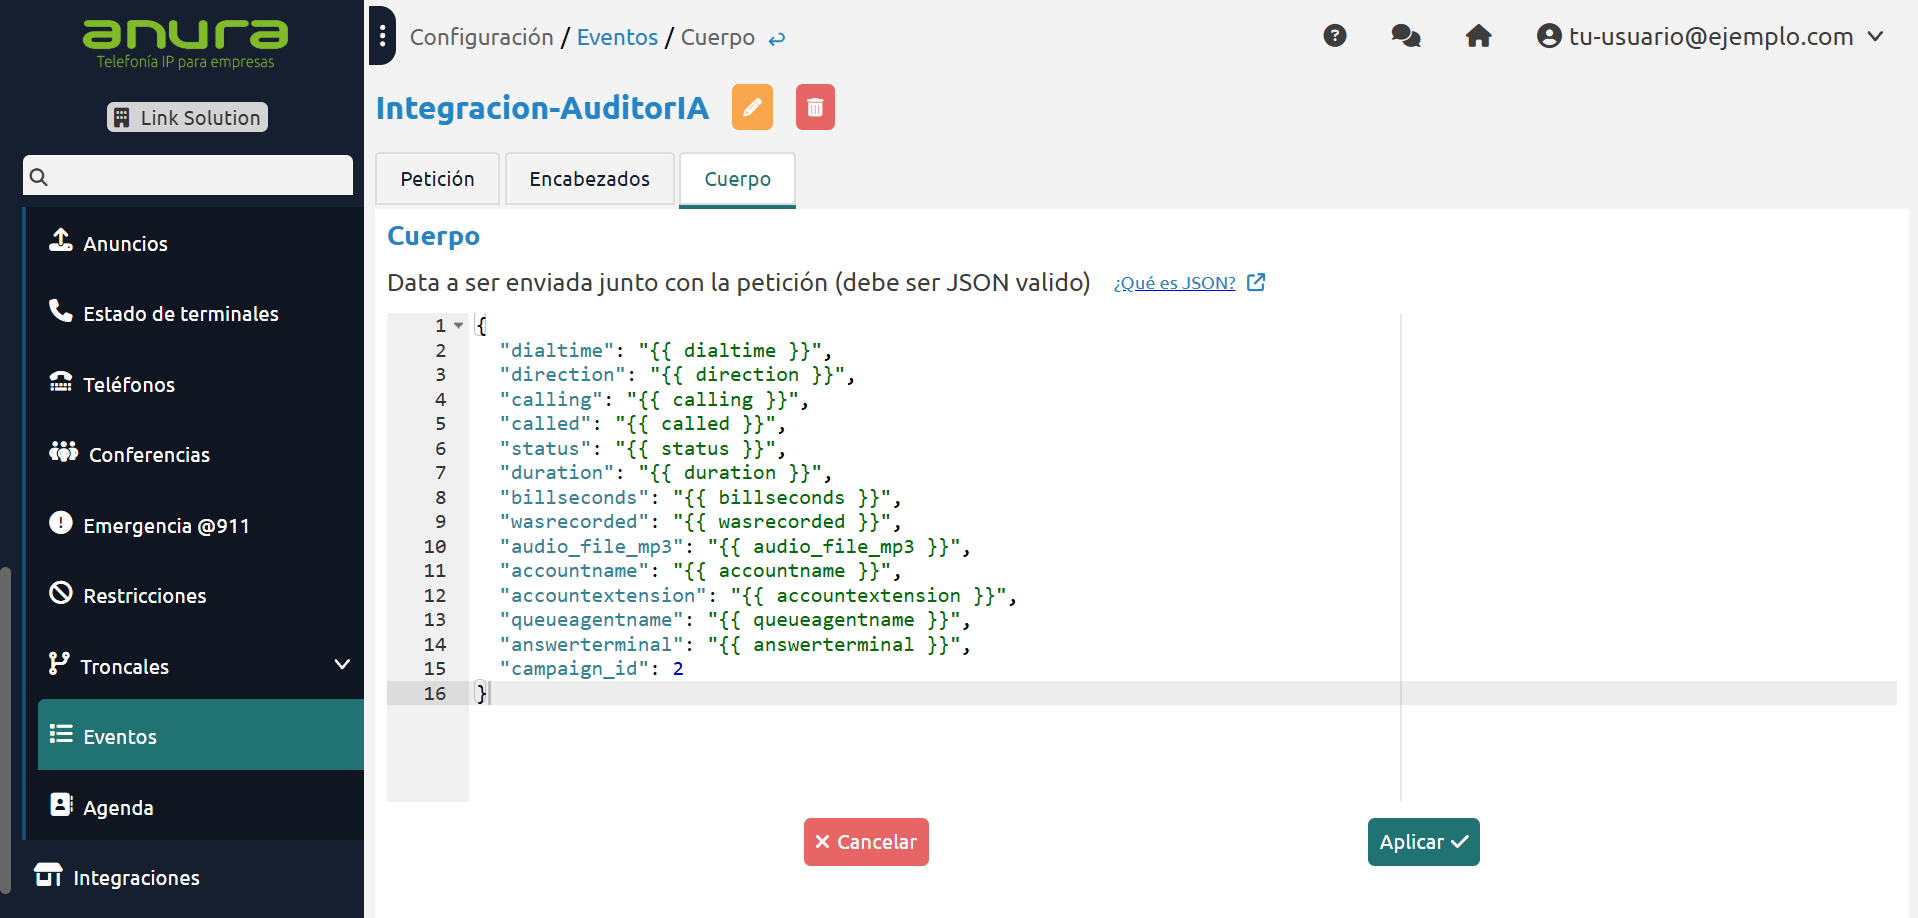
What each field is for:
| Field | What it's for |
|---|---|
dialtime | Call date and time. |
direction | Inbound (inbound) or outbound (outbound). |
calling / called | Origin and destination numbers. |
status | Final call status. |
duration | Duration in seconds. |
billseconds | Billed seconds. |
wasrecorded | Must be true. |
audio_file_mp3 | Public, accessible URL of the recording. |
accountname | Account/agent name. On outbound calls AuditorIA uses it as the operator. |
accountextension | Account extension. |
queueagentname / answerterminal | Agent name on inbound calls. AuditorIA uses it as the operator. |
campaign_id | Campaign number in AuditorIA (not a variable). |
AuditorIA identifies the operator by their name, not by the extension: on outbound calls it uses accountname; on inbound calls it uses queueagentname (or answerterminal). That's why the JSON includes all three. If your Anura names the queue agent variables differently, adjust those two values.
Anura sends the notification even if the JSON is incomplete, but AuditorIA rejects it when the call data it needs doesn't arrive: dialtime, direction, calling, called, status, duration, billseconds, accountname and accountextension. That's why it's best to paste the JSON complete, exactly as it is.
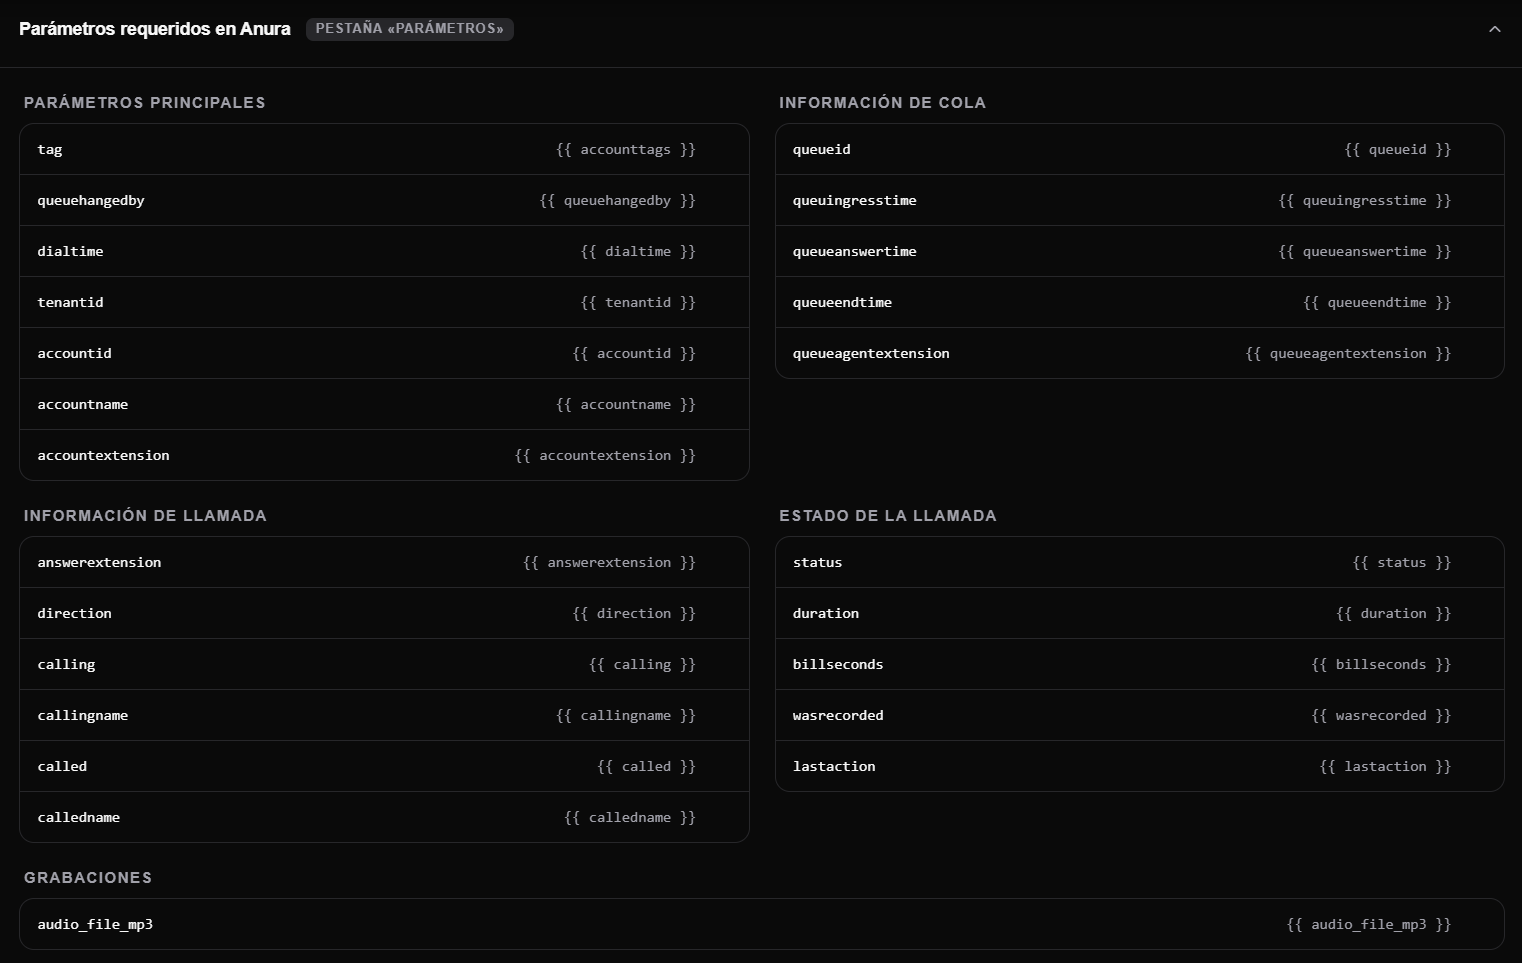
Anura also offers many other variables (for example callingname, calledname, queue data or accounttags). You can add them to the Body if you want them for your own records, but they're optional: AuditorIA doesn't use them today, so the fields in the table are enough for the call to be processed.
The {{ ... }} variables you see in the JSON are Anura's: when it sends the notification, Anura replaces them with the call's real data. You don't have to enter them anywhere else or fill in another form; they go inside the Body, exactly as they are above. The Audio Sources > Anura guide includes a list of variables for reference, but the JSON on this page is enough for the call to be processed.
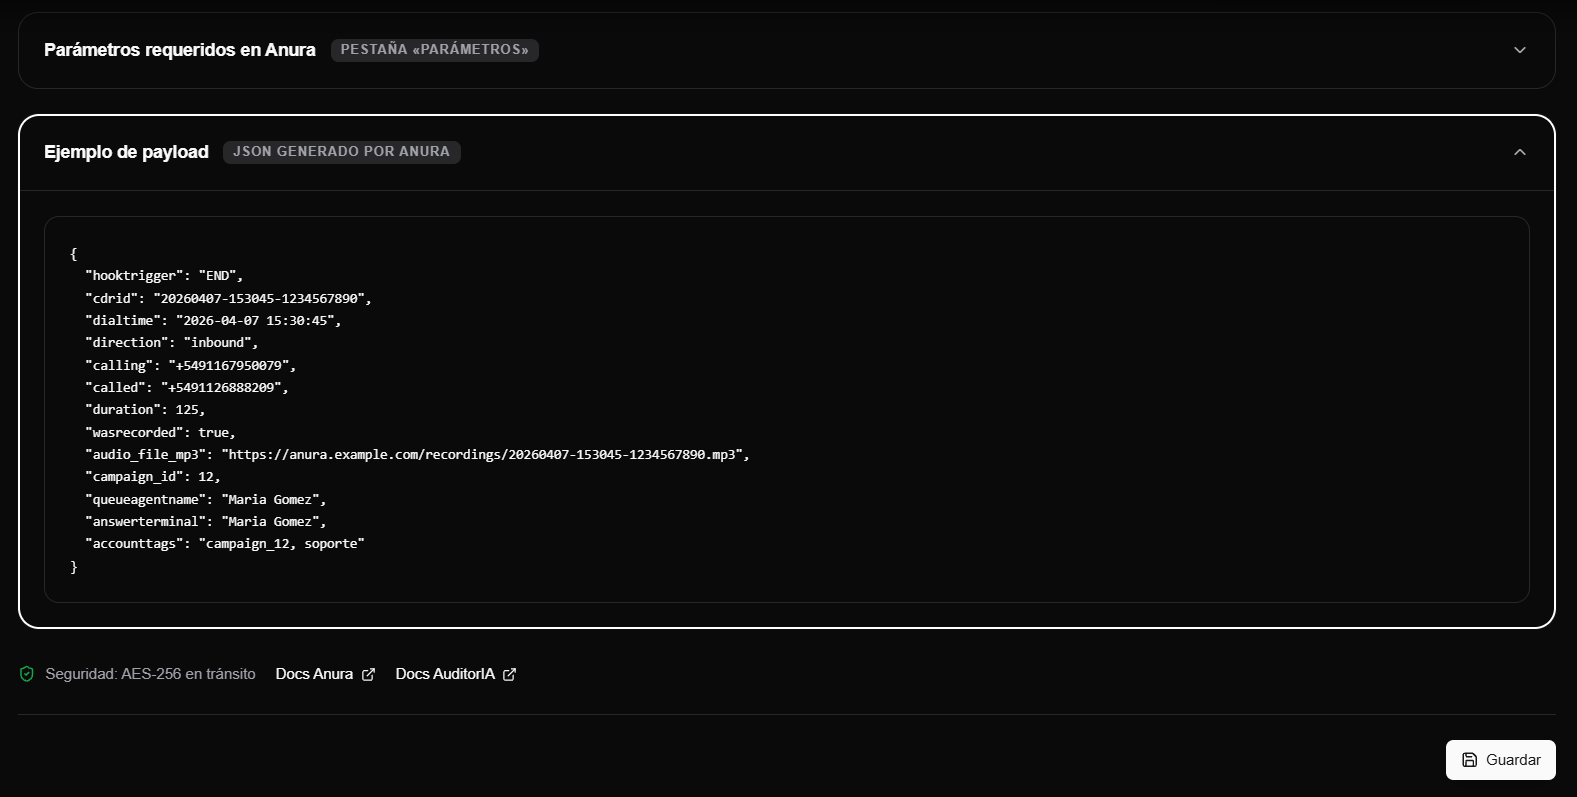
Only END events with a recording are processed. If wasrecorded is not true or audio_file_mp3 is not accessible, no task is created.
Save the event. There are no extra steps: from the next call that ends with a recording, Anura notifies AuditorIA and the call enters the flow on its own. Anura has no test button, so to confirm, make a real (short, recorded) call and check that it appears in the campaign's tasks.
What happens next
Once everything is configured, each call that ends with a recording:
- Reaches AuditorIA, which validates the API Key.
- Identifies the operator by name. If that operator doesn't exist yet, it creates it.
- Downloads the recording and creates the task.
- Enters the normal flow: it appears in Search and work with tasks, gets transcribed and is ready to review and audit.
Important notes
- Operator by name: if the agent's name in Anura doesn't match an existing operator, AuditorIA creates a new one. To avoid duplicate operators, use the same names you already have. See Manage local operators.
- Correct campaign: if
campaign_iddoesn't match a real campaign, the call may not be associated with the expected campaign. - Only END with recording: other events are received but don't create tasks.
Common issues
- No calls come in: check that the event is
END, that recording is enabled, thataudio_file_mp3is accessible and that the URL and headers are correct. - The notification is rejected (unauthorized): the
X-API-Keyis missing or incorrect. - The call enters another campaign or without the right operator: check
campaign_idand the agent name.
Net2Phone
Connect Net2Phone so recorded calls reach AuditorIA through a webhook and are ready to enter the task flow.
The configuration starts in the AuditorIA campaign. From there you can see which values the integration needs and, for each field, where to get the value in Net2Phone.
Step 1 - Open Net2Phone in Audio Sources
- In the side menu, open Campaigns > Campaign configuration > Calls.
- Open the campaign you need. If it is new, save it first.
- Go to the Audio Sources tab.
- Choose Net2Phone.
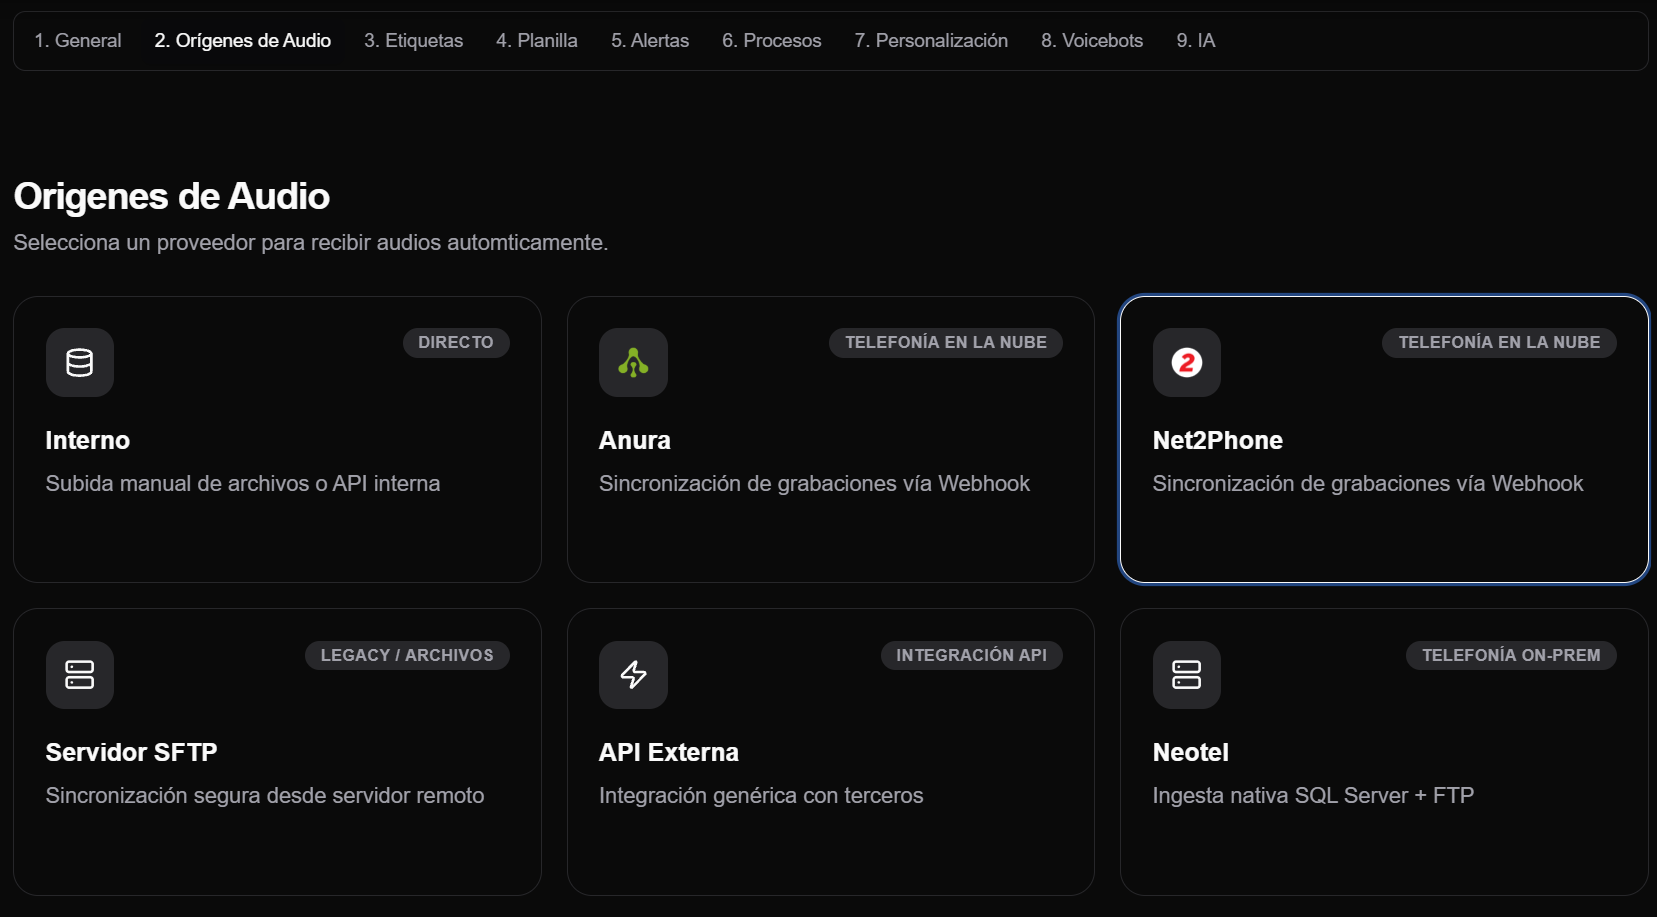
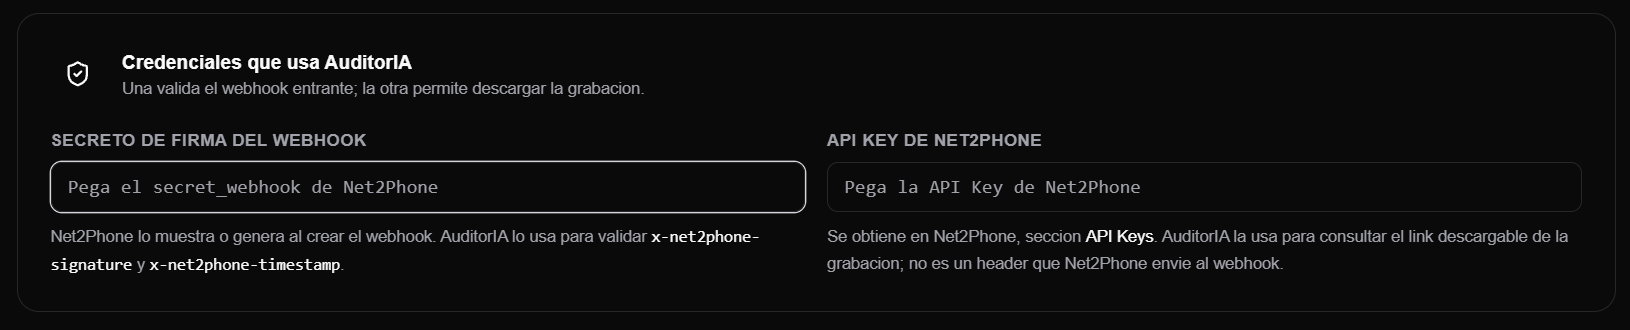
AuditorIA will ask for three values:
- Source ID: identifies which Net2Phone account belongs to this campaign.
- Webhook signing secret: allows AuditorIA to accept only events signed by the webhook you create.
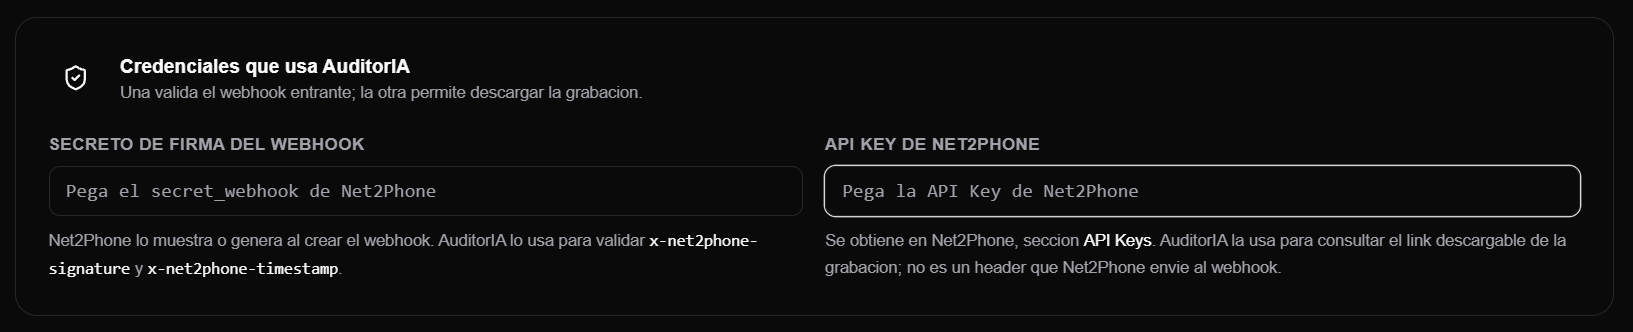
- Net2Phone API Key: allows AuditorIA to ask Net2Phone for the downloadable recording link.
Step 2 - Fill Source ID
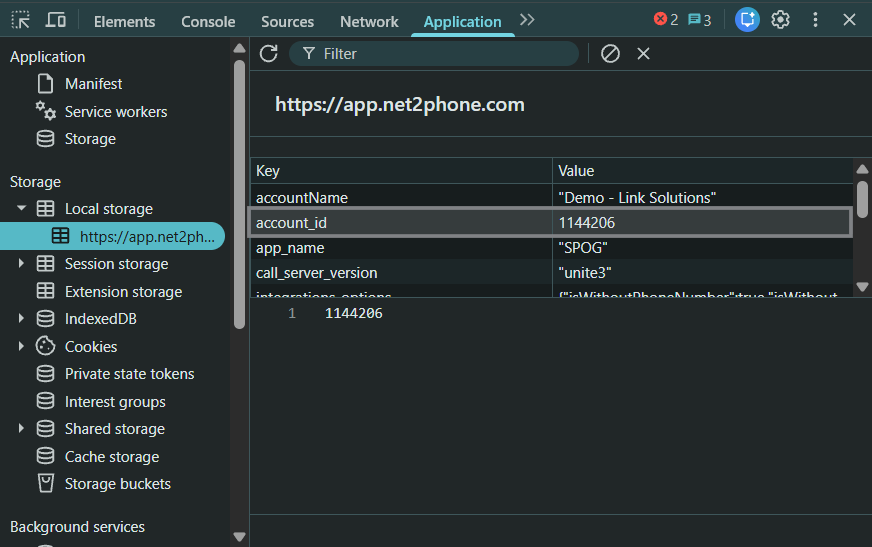
In Source ID, AuditorIA expects the numeric Net2Phone account_id. Do not use AuditorIA's internal campaign ID unless it really matches that account_id.
For Net2Phone, Source ID = Net2Phone account_id.
If your team already knows the account_id, use it directly. If it is not visible in the Net2Phone screen, you can find it from the browser:
- Sign in to Net2Phone.
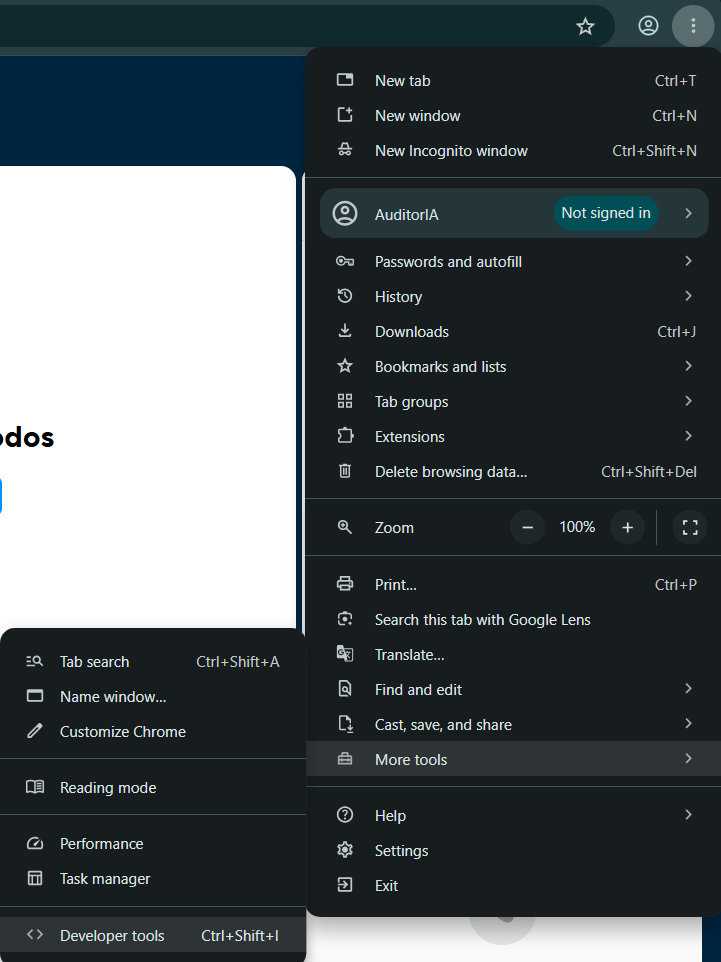
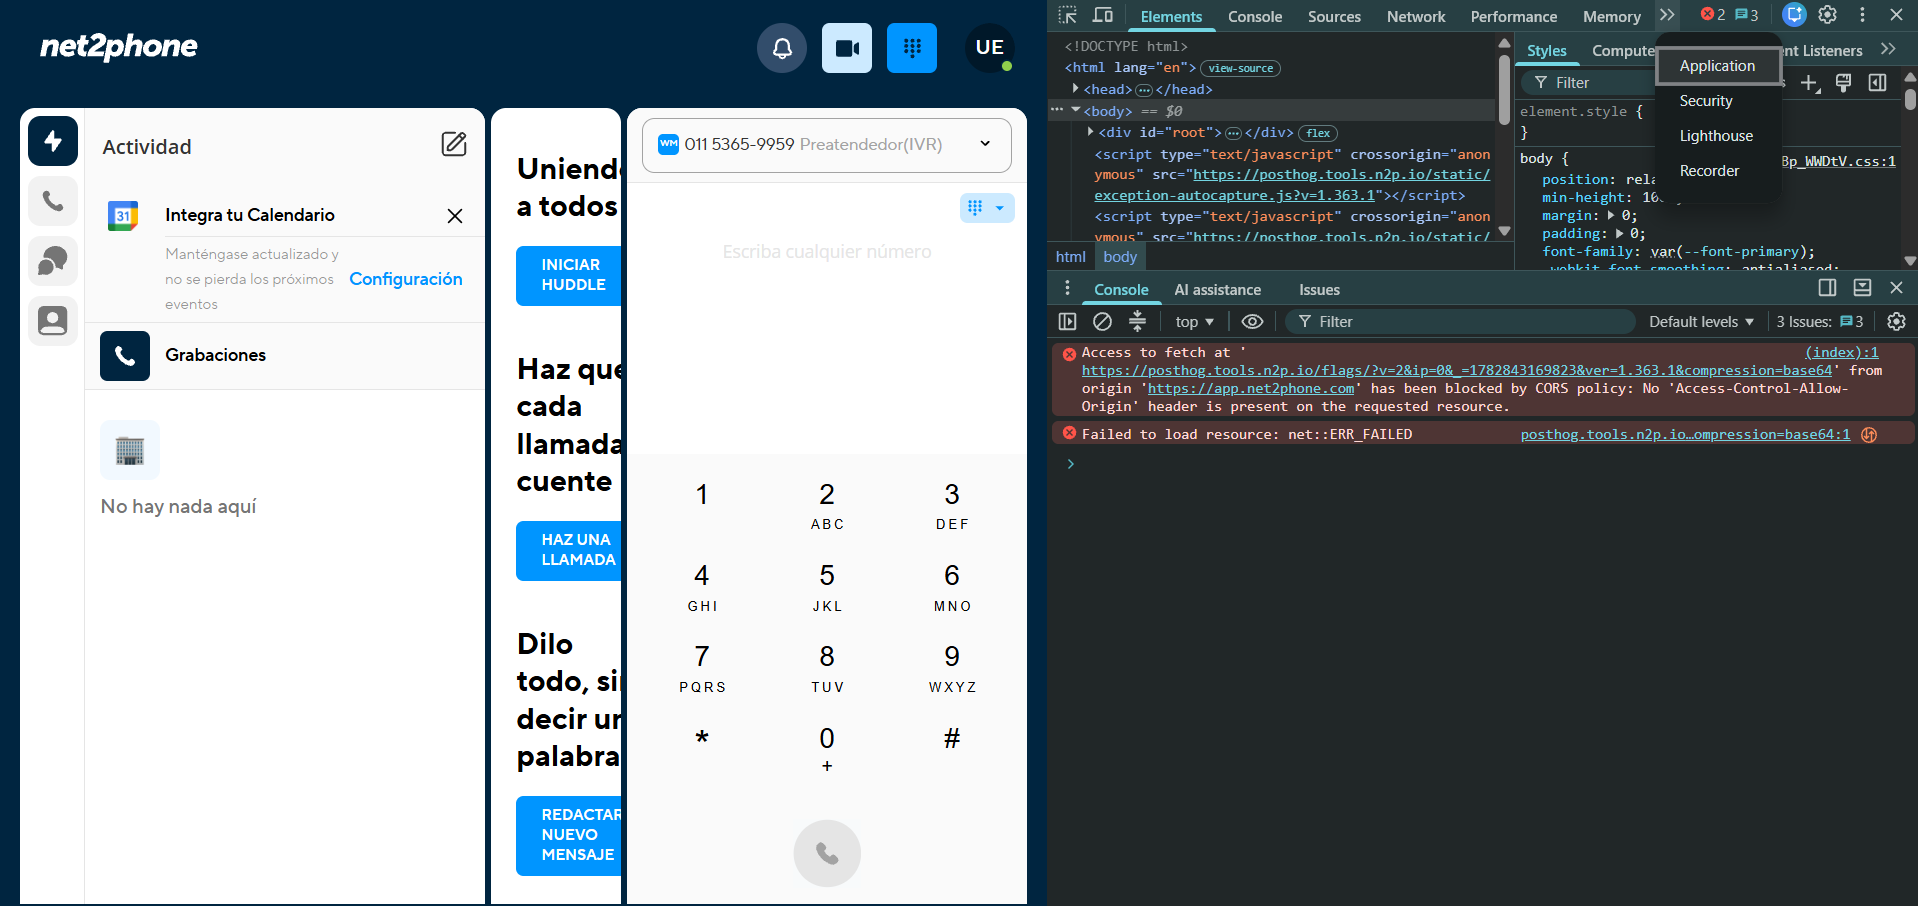
- Open developer tools with F12. In Chrome, you can also open them from the three-dot menu > More tools > Developer tools.
- In DevTools, open the Application tab.
- Under Local Storage, select the Net2Phone domain and look for account_id.
- Copy that number and paste it in Source ID in AuditorIA.
Step 3 - Create the webhook and fill the signing secret
The Webhook signing secret field is filled with a value Net2Phone shows after you save the webhook.
Before creating the webhook, copy the Destination URL. It must be the external base URL of your installation's External API and end in /webhook/net2phone/.
If AuditorIA shows the External endpoint for Net2Phone, copy it from that field. If it does not show it, or if your deployment does not have that URL configured yet, ask the deployment administrator for it. Do not build it from the URL where you browse AuditorIA, because the External API may be on another domain.
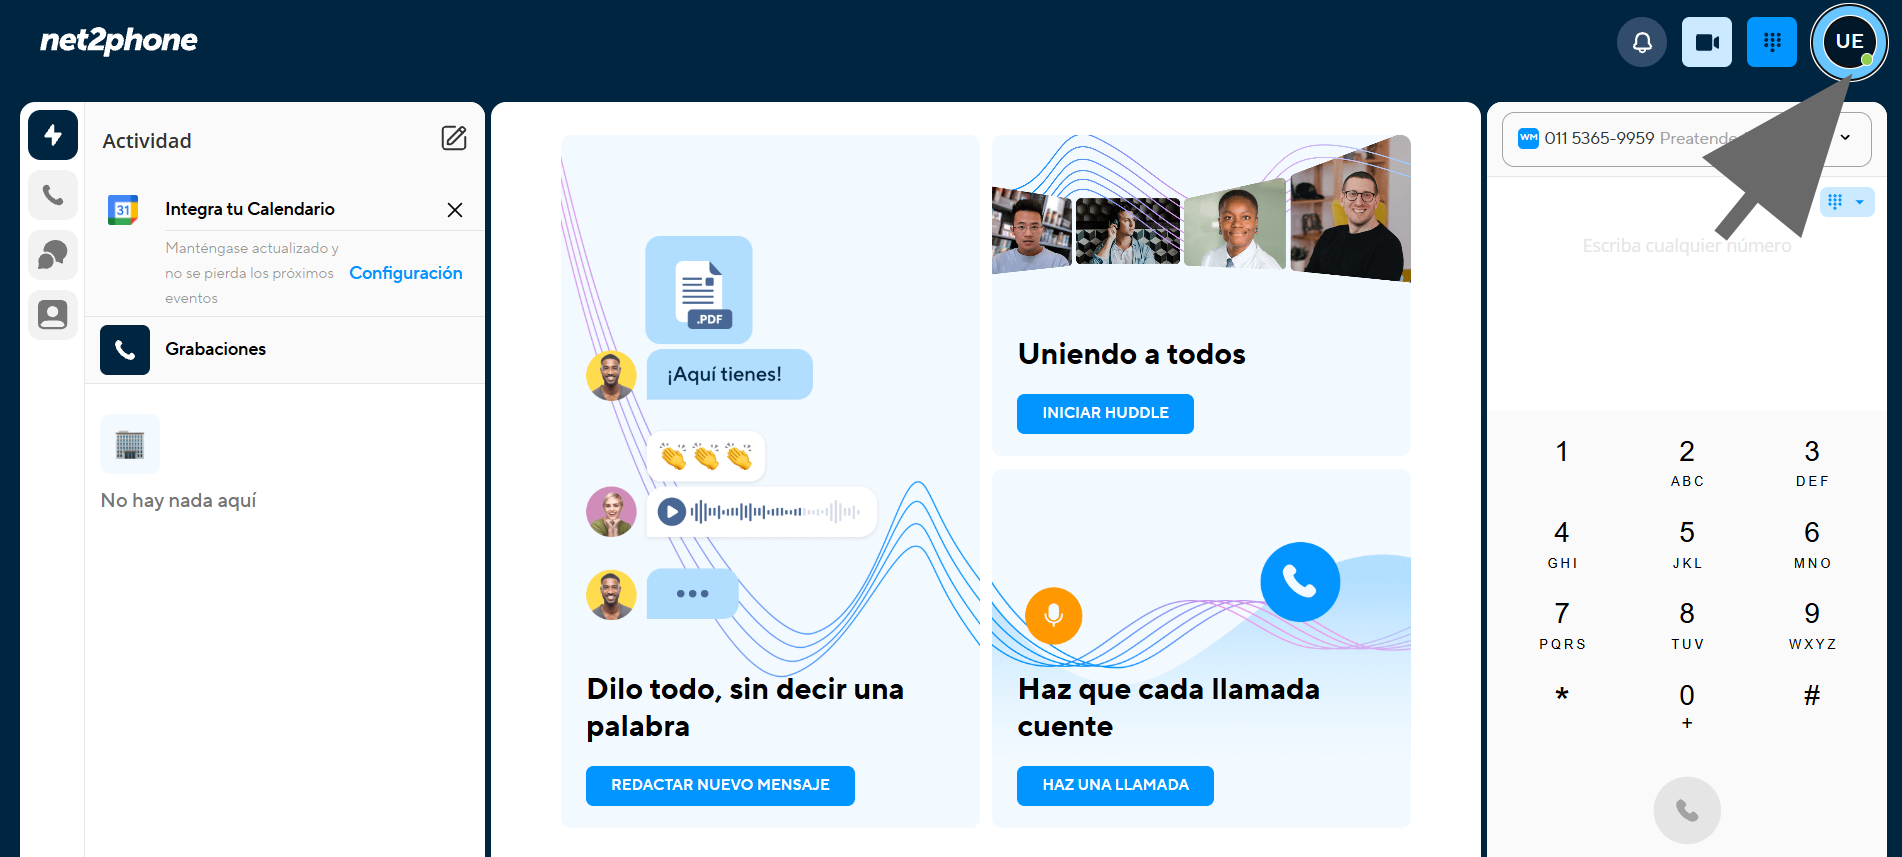
- In Net2Phone, click the user icon in the upper-right corner.
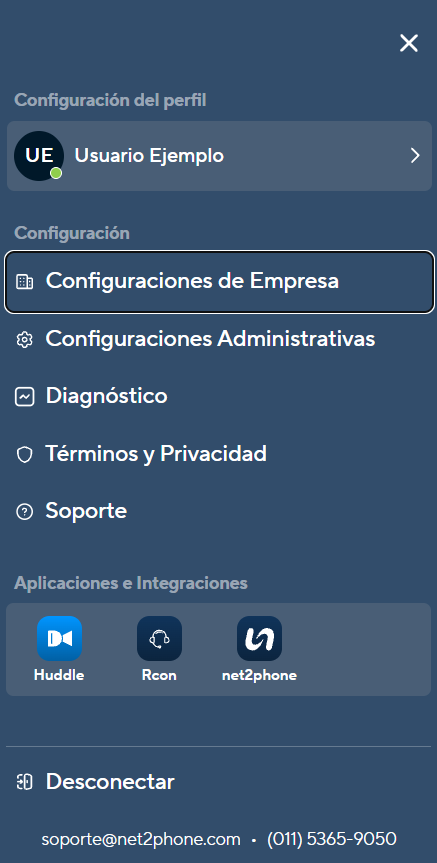
- In the menu, open Company Settings.
- Open API Settings and go to the Webhook tab.
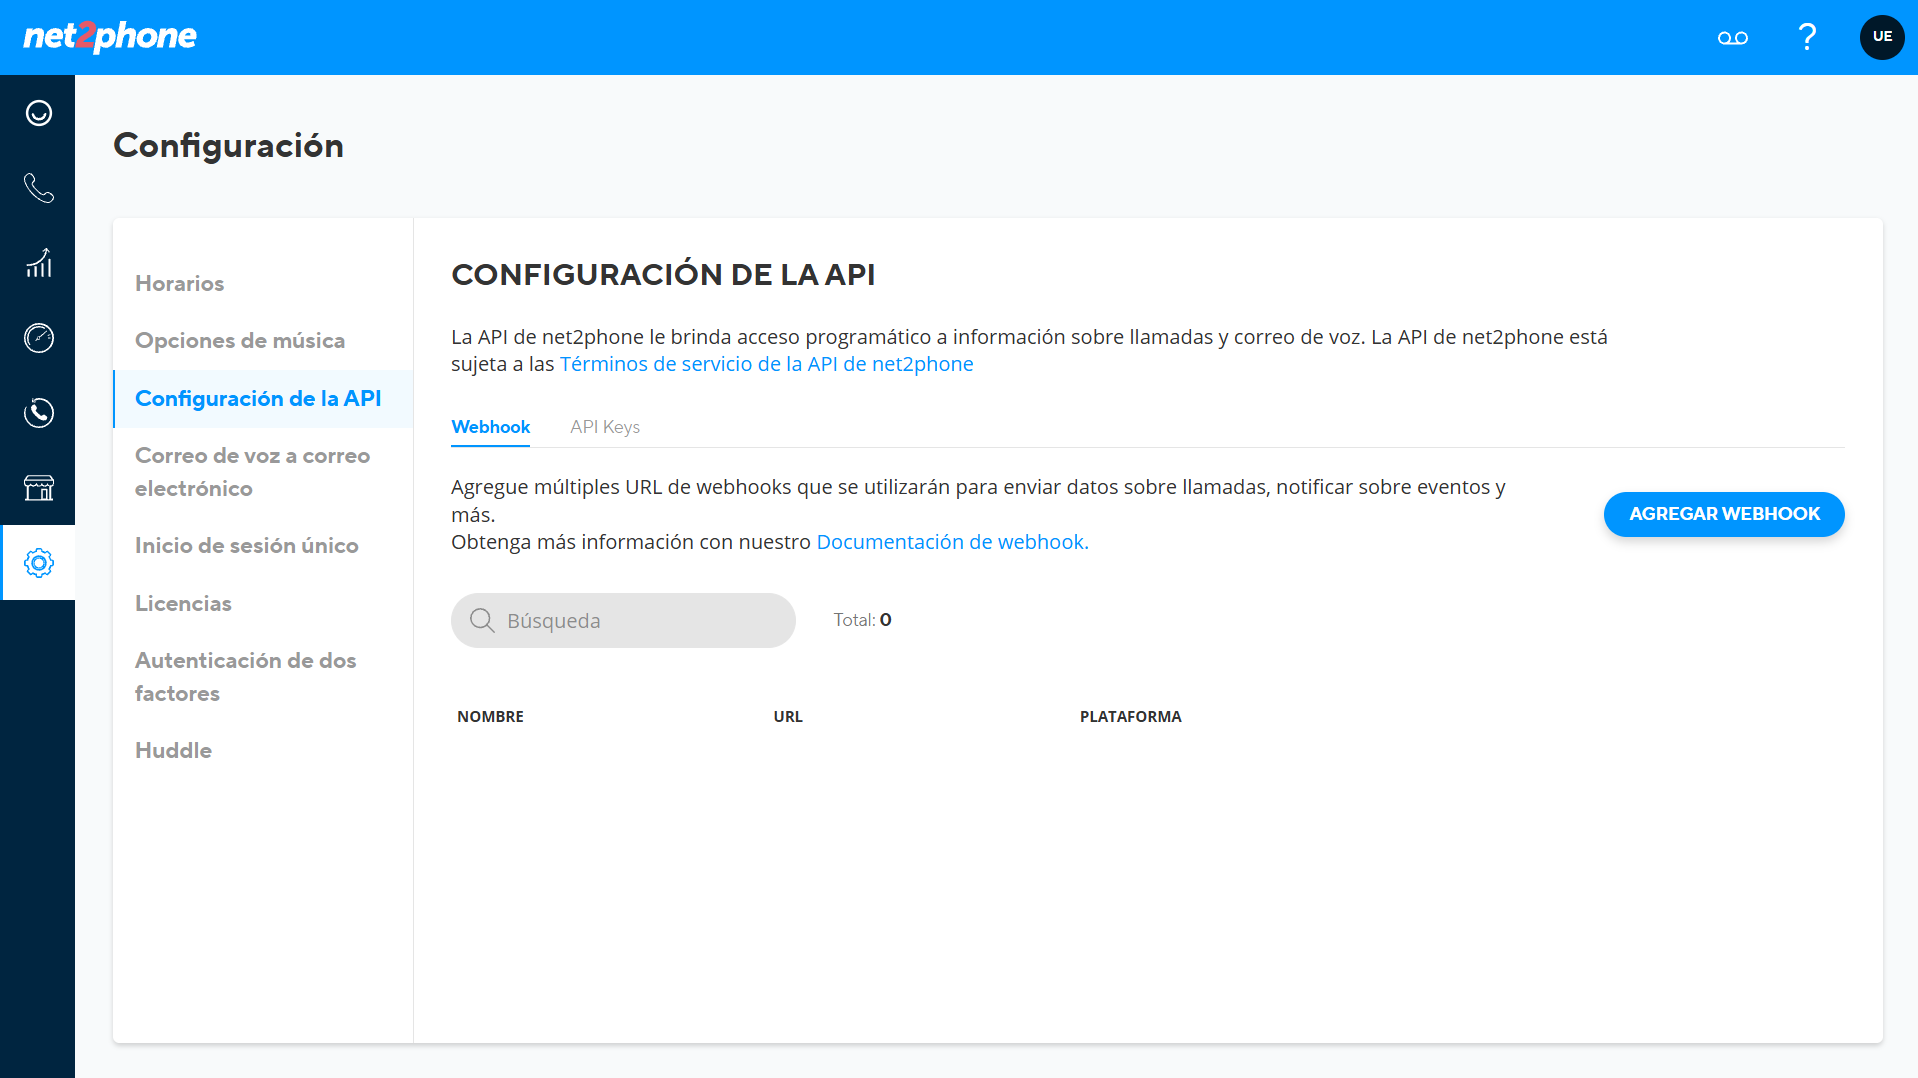
- Create a new webhook.
- In Destination URL, paste the External API public endpoint.
- Use a recognizable name, for example
AuditorIA, and fill the description if your team uses it to identify integrations.
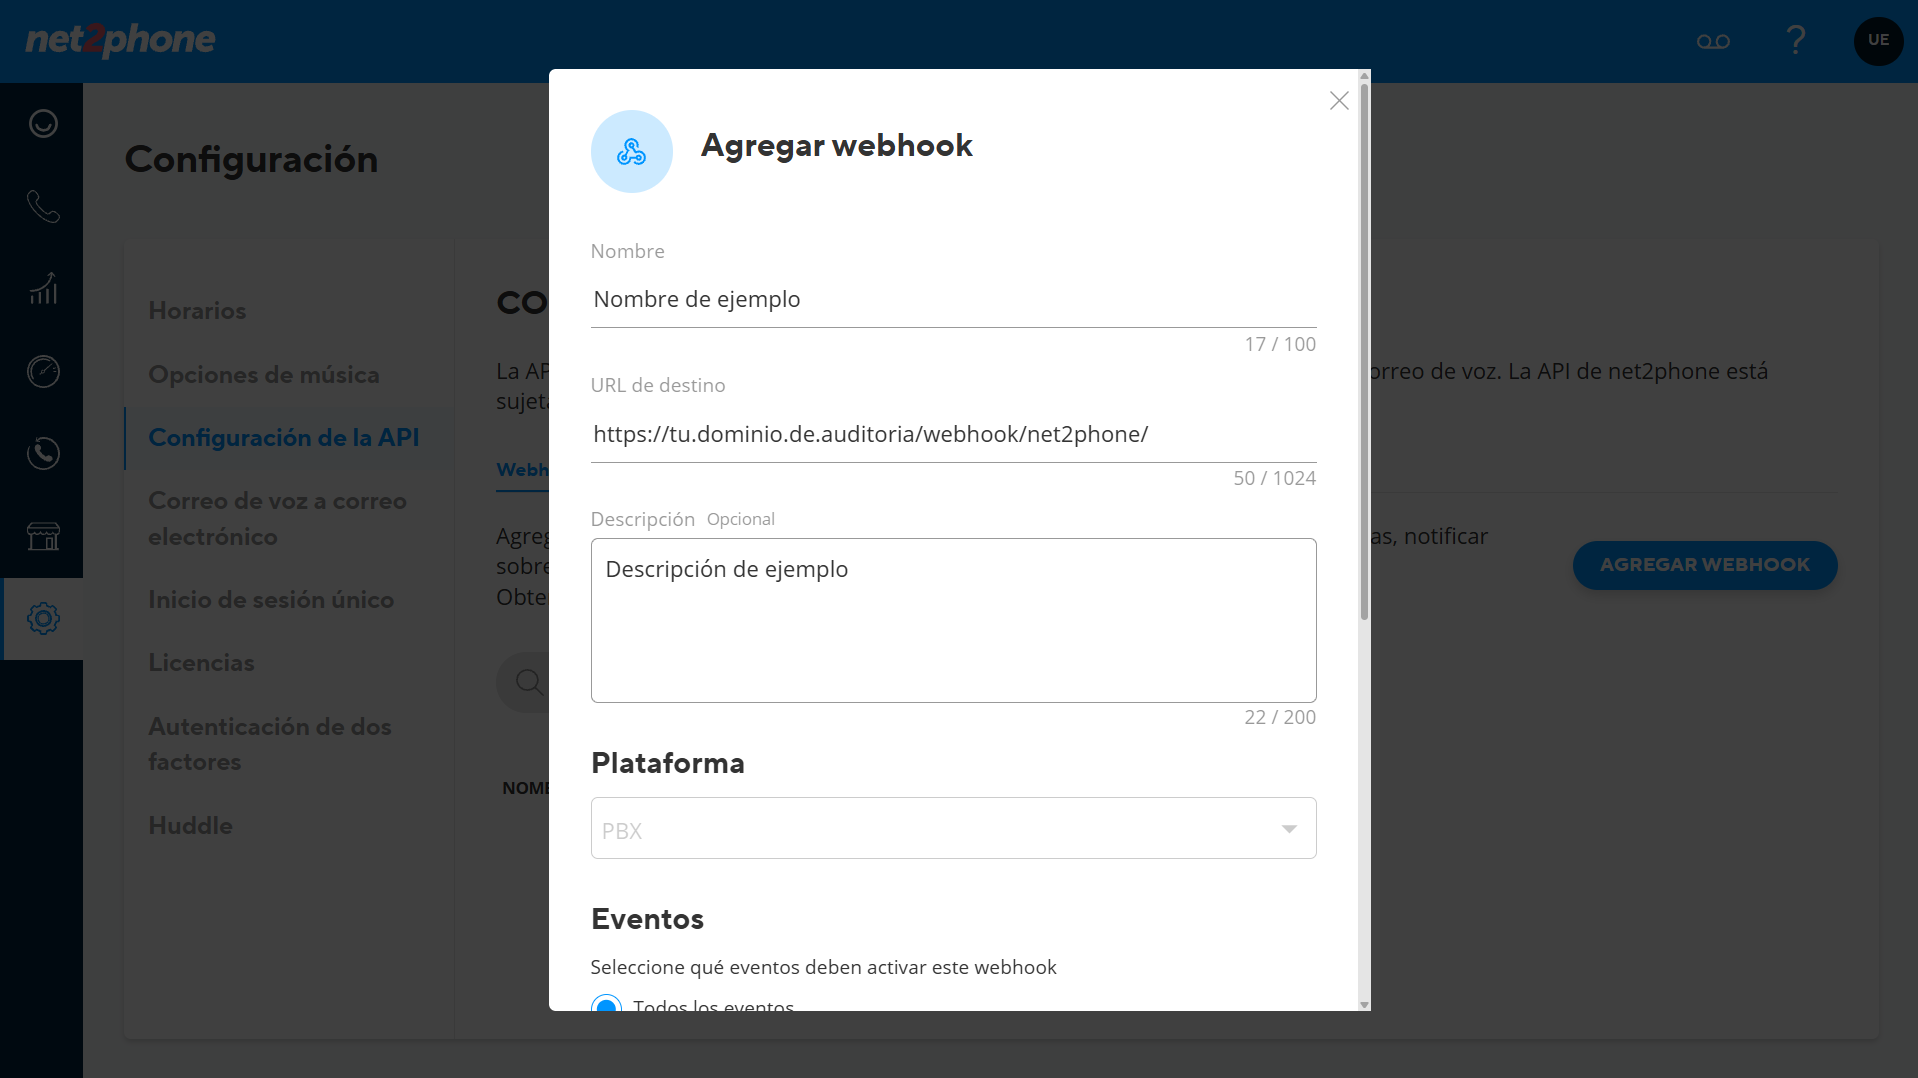
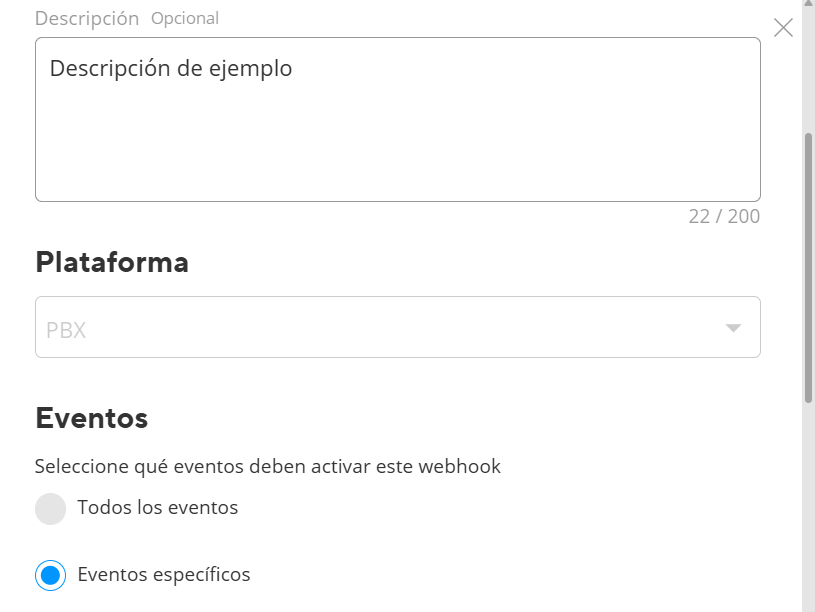
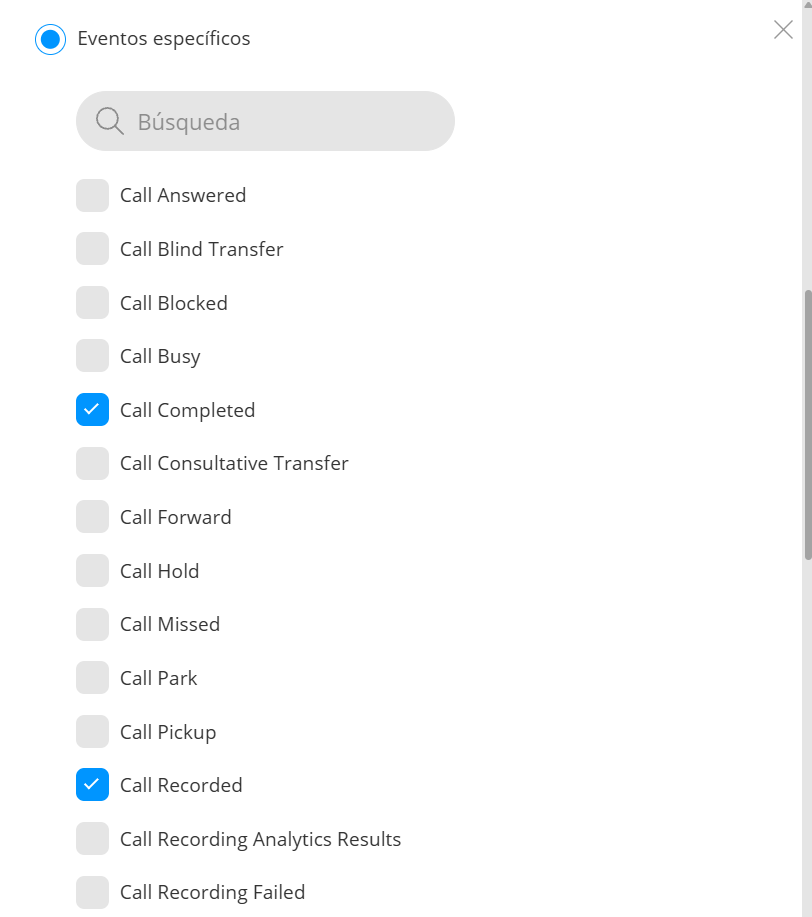
- In events, choose Specific events.
- Enable at least Call Recorded and Call Completed. If Net2Phone shows events for answered calls, inbound calls or outbound calls, it is useful to enable them too for better traceability.
- In users, choose the scope that matches the integration. To audit a whole call center, use a company-wide or all-phones option only if it really applies to every user you want to audit.
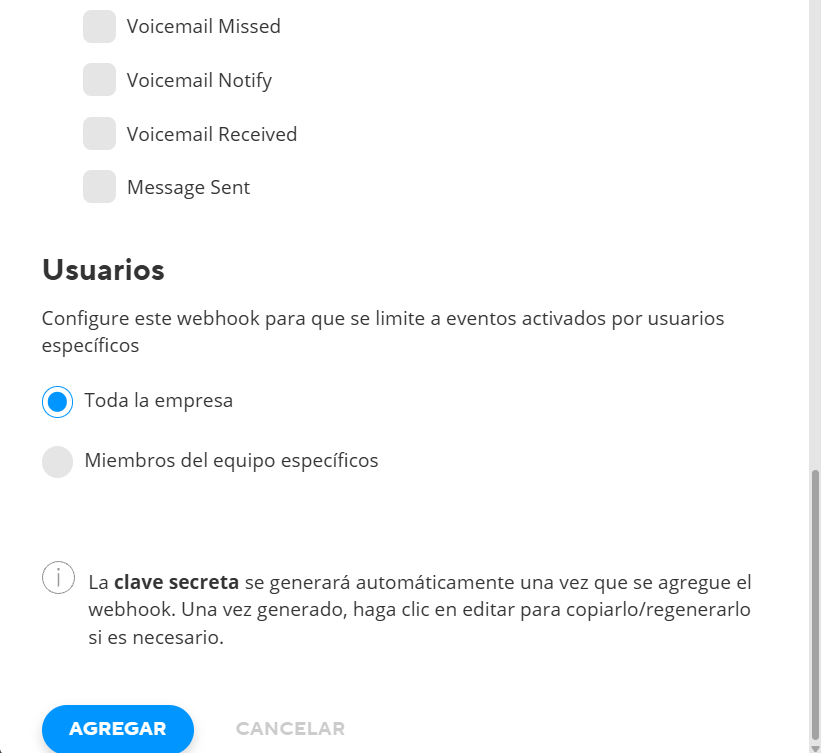
Selecting users for the webhook defines whose events Net2Phone sends. It does not replace call recording settings. Verify in Net2Phone that recording is enabled for each user, extension or phone that must be audited.
- Save the webhook.
- Go back to the webhook list and open the configuration for the webhook you just created.

- In the configuration modal, copy the Signing secret.
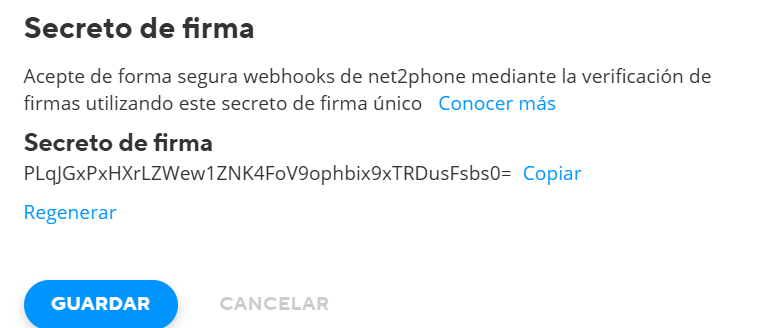
- Go back to AuditorIA and paste it in Webhook signing secret.
Step 4 - In Net2Phone: create the API Key and paste it in AuditorIA
The Net2Phone API Key field is filled with a key generated in Net2Phone. AuditorIA uses it to request the downloadable recording link when the recorded-call event arrives.
- In Net2Phone, open the API Keys tab.
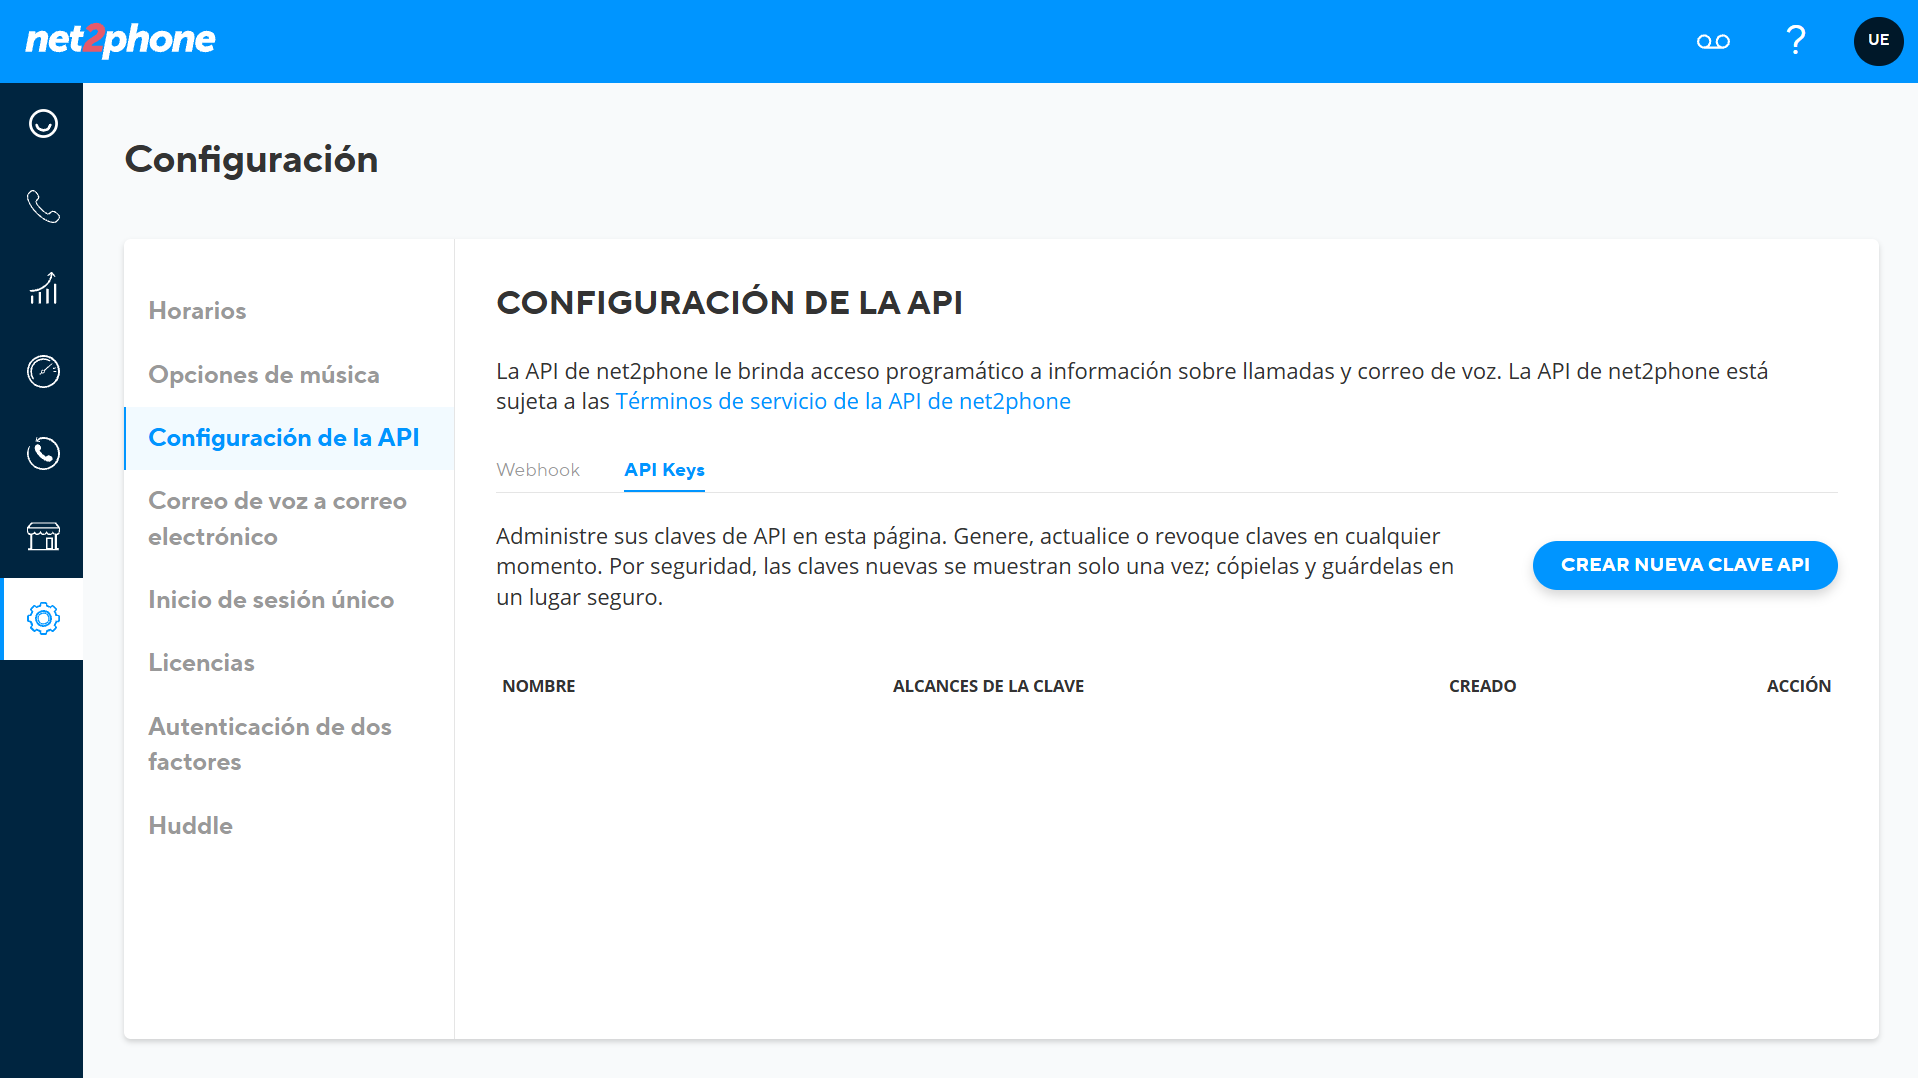
- Create a key for AuditorIA.
- If Net2Phone asks for a scope, use the scope that allows Public API v2 and recording access. In the tested environment the scope was
public_api.v2; if your account shows different options, confirm with your team or Net2Phone support.
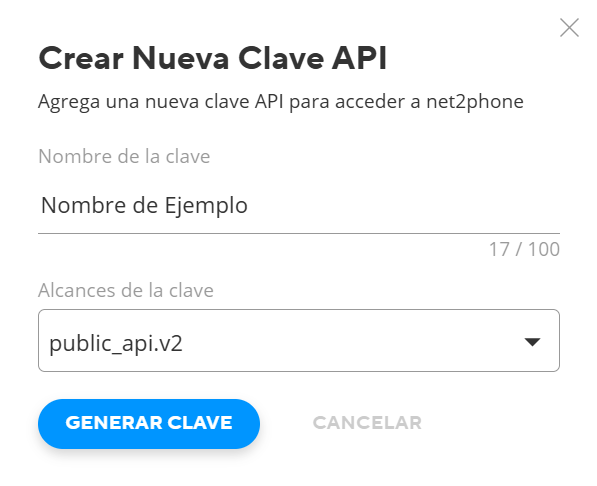
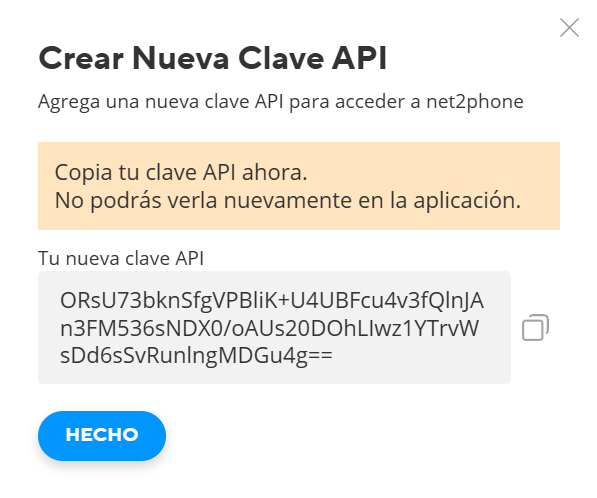
- When you create it, Net2Phone shows the full key. Copy it at that moment.
-
Go back to AuditorIA and paste it in Net2Phone API Key.
-
Save the campaign configuration.
Step 5 - Verify with a real call
To test the integration, generate a short recorded call and check:
- that Net2Phone sends
call_recorded; - that the event includes
audio_message_url; - that the event
account_idmatches the campaign's Source ID; - that a new task appears in Search and work with tasks.
The expected event for creating the task is Call Recorded (call_recorded) with audio_message_url. Call Completed (call_completed) can indicate that the call was recorded, but if it does not include an audio URL, AuditorIA has no recording to download.
Common issues
- You do not know which URL to enter in Net2Phone: ask for the deployment's external base URL for the External API. It must end in
/webhook/net2phone/. - The webhook is rejected: check that the signing secret copied from Net2Phone is the same one saved in AuditorIA.
- The call does not appear in the campaign: check that Source ID is the Net2Phone
account_id. call_completedarrives but no task is created: check whethercall_recordedalso arrived withaudio_message_url. Without an audio URL, there is no recording to download.- The download fails: check that the Net2Phone API Key is active and has permission to access recordings.
Neotel
Neotel is a phone system installed at the company itself. Unlike Anura or Net2Phone, Neotel does not notify AuditorIA of anything: AuditorIA is the one that goes looking for the calls, on its own, every few minutes, and brings the recordings back.
Use it when the campaign's calls are already being recorded in Neotel and you do not want to upload them by hand.
How it works
There is a single Neotel connected to AuditorIA, shared by every campaign. That connection (where Neotel is and which user to sign in with) is set up by your installation's administrator, once, for the whole application.
What you do in the campaign is much simpler: state that this campaign uses Neotel. From then on, AuditorIA checks Neotel every few minutes, finds that campaign's new calls, brings the recording back and records it.
The notice at the top of this page, about the webhook address, does not apply to Neotel. Neotel does not send anything to AuditorIA: it is AuditorIA that queries it, from inside the network.
Before you start
- A call campaign created and saved in AuditorIA. See Campaign configuration.
- Your installation's administrator must have already connected Neotel. This is a technical step done once for the whole application, not campaign by campaign. If it has not been done, you can still select Neotel, but no calls will come in.
- The number Neotel uses to identify that campaign. In Neotel that value appears as
IDAPLICACION. If you do not have it, ask whoever administers Neotel.
Step 1 - In AuditorIA: select Neotel
- In the side menu, open Campaigns > Campaign configuration > Calls.
- Open the relevant campaign. If it is new, save it first.
- Go to the Audio Sources tab.
- Select Neotel and save.
That activates the campaign. On the next check, AuditorIA starts including it when it looks for new calls in Neotel.
Note that AuditorIA does not ask you here for a user, a password or a Neotel address: all of that comes from the general connection the administrator set up.
Step 2 - Check that the campaign matches Neotel
This is the part that fails most often, and there is no field to type it into: it is a match that has to exist between the two systems.
AuditorIA's campaign ID (the number shown in the campaign header as Campaign ID #N) must be the same number Neotel uses for that campaign in IDAPLICACION.
AuditorIA looks in Neotel for calls whose IDAPLICACION equals the campaign ID. If those two numbers are not the same, the search returns nothing: the campaign stays empty even though everything else is configured correctly.
If they do not match, do not try to fix it from this screen. Check with whoever administers Neotel or with your installation's administrator.
Advanced options
The Neotel panel includes an Advanced overrides block, with a toggle and a text box for pasting configuration. It covers an uncommon case: this particular campaign needing to connect to a different Neotel than the rest.
Leave it off. With the toggle off, the campaign uses the general connection, which is correct in practically every case. Filling this block in incorrectly can leave the campaign receiving no calls.
What happens next
When AuditorIA finds a new call in Neotel, it brings the recording back and leaves it as a call record in the campaign.
That record is not a task yet. For it to become a task and be transcribed, the campaign must have Automatic Call Dispatch enabled. See Automatic dispatch in Campaign configuration.
This is the main difference from Anura and Net2Phone, which create the task directly. With Neotel, if the campaign has no automatic dispatch, calls come in and are recorded, but are not processed.
With automatic dispatch enabled, calls follow the normal flow: they appear in Search and work with tasks, get transcribed and are ready to review and audit.
Important notes
- The connection is one and the same for every campaign: if it changes, it affects every campaign using Neotel, not just yours.
- Selecting Neotel does not turn recording on: the calls must already be recorded in Neotel. AuditorIA only fetches what already exists.
- The data shown on screen is for reference: the Neotel panel shows database names, commands and internal configuration. Those are details for the installation's administrator, not steps for you to run. To connect the campaign it is enough to select Neotel, save and check the ID match.
Common problems
- No calls come in: confirm with your installation's administrator that the general Neotel connection is configured and active. Rule that out first, because it is not visible from this screen.
- The campaign is saved with Neotel but stays empty: check that the campaign ID matches Neotel's
IDAPLICACION(step 2). - Calls come in but are not processed: the campaign does not have Automatic Call Dispatch enabled, or the calls fall outside its duration or age filters.
- One specific call is missing: its recording may not be available on the Neotel side. Check with whoever administers it.
External API
External API is the path for a system you already have -a recorder, a CRM, your own application- to send audio to AuditorIA on its own, without anyone uploading it by hand.
It differs from Anura and Net2Phone in one point. In those integrations, the external platform notifies AuditorIA on its own once you configure it with clicks. Here there is no platform configured that way: AuditorIA provides the address, the credential and the message format, and the system that holds the audio has to be programmed to send it.
This is the only integration in the manual that requires someone to write the sending code: a developer, or the technical contact for the system that stores the recordings. Steps 1 and 2 are administrative and anyone can do them from AuditorIA. Step 3 is the part you hand over to that person.
When to use it
Use it when you already have the audio in another system and you want it to enter AuditorIA on its own, but that system is neither Anura nor Net2Phone. For example: the call center's own recorder, a CRM that stores calls, or a process that downloads recordings from somewhere else.
If a person is going to upload the audio from the AuditorIA screen, you don't need this integration: use Internal.
Before you start
- A call campaign created and saved in AuditorIA. You'll need its campaign number. See Campaign configuration.
- A quality scorecard linked to that campaign, so you can audit afterwards. See Quality scorecards.
- An AuditorIA API Key (the credential that authorizes each upload).
- The campaign's operators already loaded, because every upload states which operator the call belongs to. See Manage local operators.
- Your installation's external API URL: the same base address Net2Phone uses, without the webhook part. If you don't know it, ask the deployment administrator. Do not build it from the URL where you browse AuditorIA, because the API may be on another domain.
Step 1 - In AuditorIA: choose External API in the campaign
- In the side menu, open Campaigns > Campaign configuration > Calls.
- Open the campaign you need. If it is new, save it first.
- Go to the Audio Sources tab.
- Choose External API and save.
Unlike SFTP Server or Net2Phone, this screen has no fields to fill in: it is informational. It shows the link to the API's technical documentation and reminds you where to create the API Key.
Step 2 - Create the API Key
- Open Settings > API Keys (
/dashboard/settings/api-keys). - Generate an API Key and copy it.
It's the credential that authorizes every upload. Store it in a safe place as soon as you create it, and share it only with whoever will program the integration.
Step 3 - Program the audio uploads
This is the part handled by the system that holds the recordings. Each audio file is sent with a message (an HTTP request) carrying three things: the credential, the audio and the call data.
The credential
The API Key travels as a header:
X-API-Key: <YOUR_API_KEY>
The rest of the data, including campaign_id, are not headers: they travel inside the message. If you send campaign_id as a header, AuditorIA won't read it and the upload will fail.
Choose how to send the audio
There are three ways, depending on how your system holds the audio. All three do the same thing: they create the call in AuditorIA. Pick whichever is simplest for you.
| If your system has... | Method | Address |
|---|---|---|
| the audio file stored | file upload | POST /upload |
| a public link to the audio | upload by link | POST /upload/from-url |
| the audio in memory, with no file | upload as text (base64) | POST /upload/from-base64 |
- File upload (
/upload): the audio is attached and the data goes as form fields (multipart/form-data). This is the classic method. - Upload by link (
/upload/from-url): instead of the audio, you pass a URL that AuditorIA downloads it from. That URL must open without a username or password. - Upload as text (
/upload/from-base64): the audio is converted to text inside the message. This is the recommended method when the system cannot send file attachments.
The full address is the external API URL plus that path. For example: https://api.your-auditoria-domain/upload/from-url.
The call data
It travels inside the message: as form fields in the file upload, and inside the JSON in the other two methods.
| Field | Required | What it is |
|---|---|---|
campaign_id | Yes | The campaign's number in AuditorIA. You see it in the campaign header as Campaign ID #N. |
username | Yes | The user recorded as responsible for the upload. |
operator_id | Yes | The number of the operator the call belongs to. |
call_start_date | No | Start date and time, in YYYY-MM-DD HH:MM:SS format (for example 2026-04-06 11:18:56). If you don't send it, the server time is used. |
language | No | Audio language. Defaults to es. |
model | No | Transcription model. Defaults to nova-3. |
ani_tel | No | Customer phone number, up to 30 characters. |
direction | No | Call direction: inbound or outbound. |
Each method also requires its own field: /upload the file in the file field; /upload/from-url the audio url; /upload/from-base64 the audio in audio_base64 and its name in file_name, with extension (for example recording.mp3).
The file upload (/upload) does not accept ani_tel or direction. If you need to store the customer's phone number or the call direction, use the upload by link or the upload as text.
Audio limits
- Accepted formats:
mp3,wav,ogg,m4a,flac,aac. - Maximum size: 50 MB per audio file (the deployment's default value).
- Up to 10 uploads per minute. If you send more, the rest are rejected until the next minute.
Examples
Upload by link:
curl -X POST "https://api.your-auditoria-domain/upload/from-url" \
  -H "X-API-Key: <YOUR_API_KEY>" \
  -H "Content-Type: application/json" \
  -d '{
    "url": "https://your-system/recordings/call-123.mp3",
    "campaign_id": 12,
    "username": "crm-integration",
    "operator_id": 45,
    "ani_tel": "1122334455",
    "direction": "outbound",
    "call_start_date": "2026-04-06 11:18:56"
  }'
File upload:
curl -X POST "https://api.your-auditoria-domain/upload" \
  -H "X-API-Key: <YOUR_API_KEY>" \
  -F "file=@call-123.mp3" \
  -F "campaign_id=12" \
  -F "username=crm-integration" \
  -F "operator_id=45"
Upload as text (base64):
curl -X POST "https://api.your-auditoria-domain/upload/from-base64" \
  -H "X-API-Key: <YOUR_API_KEY>" \
  -H "Content-Type: application/json" \
  -d '{
    "audio_base64": "<AUDIO_IN_BASE64>",
    "file_name": "call-123.mp3",
    "campaign_id": 12,
    "username": "crm-integration",
    "operator_id": 45
  }'
Replace 12 and 45 with your campaign number and your operator number.
What AuditorIA replies
If the upload is accepted, the response confirms the call is queued:
{
  "task_id": "8f3c1a2e-...",
  "status": "queued",
  "message": "File downloaded and queued successfully"
}
Store the task_id if you want to be able to trace that call later.
On the external API URL, the /docs path opens a page where you can see every field and try the uploads (for example https://api.your-auditoria-domain/docs). The file upload (/upload) is not listed on that page; the other two methods are.
How to check it's working
Send a short test audio file and check that a new task appears in Search and work with tasks, inside the campaign you specified.
When you choose External API, the Audio Sources tab shows a Test button. Today that button checks nothing: it returns an error even when everything is configured correctly. Don't read it as a sign that something is wrong. The valid way to verify is to send a real audio file.
What happens next
When AuditorIA accepts the upload:
- It stores the audio and creates the task and the call record.
- The task enters the normal flow: it appears in Search and work with tasks, gets transcribed and is ready to review and audit.
It does not depend on the campaign's automatic dispatch: the task is created together with the upload.
Common issues
- It replies that authentication is missing (401): the request doesn't carry the API Key. Check that the header is named
X-API-Key. - It replies that the API Key is invalid (403): the key was copied wrong or was revoked. Generate a new one in Settings > API Keys.
- It replies that the campaign was not found (404): the
campaign_iddoesn't match any campaign. Check the number in the campaign header and that the campaign is saved. - It replies that the file was already uploaded (409): an audio file with that same file name already entered for that same
username. Change the file name or use another upload user. - It replies that the file is too large (413): the audio exceeds the 50 MB limit.
- It replies that the data is invalid (422): check the
call_start_dateformat, that the file extension is one of the accepted ones, and -if you uploaded by link- that the URL opens without a username or password. - It replies that there are too many uploads (429): the 10 uploads per minute limit was exceeded. Space out the uploads.
- The upload is accepted but the call doesn't appear where you expected: check that
campaign_idandoperator_idare correct.
SFTP Server
Connect an SFTP server so that the recordings your system leaves there enter AuditorIA on their own, without anyone uploading them by hand.
This is the right source when your phone system, your recorder or some internal process already drops the audio files into a folder on a server, and all that is missing is for AuditorIA to pick them up.
How it works
Every so often, a sync service logs into the server with the details you enter, checks the folder you point it to and downloads the new recordings. From each file it works out who handled the call (from the file name or from the folder it is stored in) and hands it over to AuditorIA, which creates the task and leaves it ready to audit.
The connection is configured from AuditorIA, but the component that downloads the audio is a separate service that your installation must have running. Check with whoever administers your deployment before you start: if that service is not active, you will still be able to save the configuration and the connection test will pass, but no audio will come in.
Before you start
Gather these details:
- A call campaign created and saved in AuditorIA. See Campaign configuration.
- The server address (host) and the port (usually 22).
- The user and its password, or the private key if the server uses a key instead of a password.
- The path of the folder where the recordings are stored, for example
/recordings/. - Knowing how the files are named and how they are organised into folders. That is what you will later explain to AuditorIA so it knows who each call belongs to.
Step 1 - Choose SFTP Server in the campaign
- In the side menu, open Campaigns > Campaign configuration > Calls.
- Open the campaign you need. If it is new, save it first.
- Go to the Audio Sources tab.
- Choose SFTP Server.
Step 2 - Enter the server details
Fill in the fields with the details you gathered:
| Field | What to enter |
|---|---|
| Host | The server address, for example sftp.mycompany.com, or its IP. |
| Port | The server port. Unless you were told otherwise, it is 22. |
| User | The user that logs into the server. |
| Password / Key | That user's password. If your server uses a private key instead of a password, paste the whole key into this same field. |
| Remote Path | The folder where the recordings are, for example /recordings/. |
AuditorIA stores the password (or the key) encrypted. When you reopen the screen you will see the field filled with asterisks: that is normal. If you need to change it, type the new value over it; if you are leaving it as is, do not touch it.
Step 3 - Test the connection
Before moving on, click Test. AuditorIA tries to log into the server right then with the details you entered.
- Connected: the address, the user and the password are correct.
- Error: the message tells you what failed. It is almost always a mistyped detail, a server that is down, or a firewall blocking the connection.
- Pending: the connection has not been tested since you entered or changed the details.
The test confirms that AuditorIA can log into the server with that user. It does not check that the Remote Path exists or that it has audio files in it, and it does not download any file. If the test passes but no recording ever comes in, check the path.
If the message warns that the password is masked, type it again and test once more: for security reasons, AuditorIA does not use the asterisked value for the test.
Step 4 - Tell AuditorIA how to read your files
Below the connection details is the File processing section. This is where you tell AuditorIA how to interpret each recording it downloads. Changes you make in this block can take up to 5 minutes to take effect.
Who handled each call
Every call has to end up assigned to an operator. That is defined in three parts.
1. Default operator. This is the operator used when it is not possible to tell who handled the call. Pick it from the search box.
If you leave it empty, recordings with no identifiable operator are not processed and are marked as failed.
2. Where the operator comes from. Choose one of the two options:
- From the file name: the recording's name includes who handled the call. It is read using the format you define below.
- From the containing folder: the operator is the name of the folder the audio is in. For example, in
/recordings/2026/07/20/Juan Perez/call.mp3the operator is Juan Perez. This works well when the file name is used for other details, such as the date or the customer. If the folder is a number, it is taken as the operator's external ID instead of their name.
3. How they are assigned. Choose one of the three options:
- Detect the operator and create it if it does not exist: if the operator is not in AuditorIA yet, it is created automatically. Use this when the names in your files or folders are reliable.
- Use existing operators only: if the operator coming from the file is already in AuditorIA, the call is assigned to them; if not, the default operator is used. New operators are never created.
- Assign everything to the default operator: every call from this source goes to the default operator, no matter what the file says.
If you choose Use existing operators only or Assign everything to the default operator, you must have picked a default operator above. AuditorIA flags this before you save.
Start with Detect the operator and create it if it does not exist. If over time you notice duplicated operators or odd names, switch to Use existing operators only.
How your files are named
If your recordings follow a fixed naming format, AuditorIA can read it and fill in the call date, the operator, the customer and other details on its own.
You have two options:
- Use the campaign's naming format: if the campaign already has a format defined in its Automation tab, turn the switch on and that same format is reused. This is the simplest option.
- Define a format just for this source: turn that switch off and build it here. This helps when the files on the server are named differently from the ones uploaded by hand.
To build it, add the parts in the same order in which they appear in the file name, and choose the separator that divides them (usually _).
The available parts are:
| Part | What it represents |
|---|---|
| Operator ID | The operator number. |
| Operator Name | The name of the person who handled the call. |
| Call Date | The date of the call. You choose the format it is written in. |
| Customer Name | The customer's name. |
| Customer Document | The customer's ID document. You choose the type (national ID, passport, etc.). |
| Campaign ID | The campaign number. |
| Direction | Whether the call was inbound or outbound. |
| Ignore | A part that appears in the name but that you do not care about. |
For example, with _ as the separator and the parts Operator ID, Customer Document, Operator Name, Call Date and Campaign ID, a file named 2060_DNI12345678_Ramiro Gumma_27052026_10.mp3 is read as: operator 2060, customer with document DNI 12345678, handled by Ramiro Gumma, call from 27/05/2026, campaign 10.
The screen shows an example built from the parts you pick. Compare it with a real file name before saving.
The operator parts of the file name are ignored: the folder wins. Everything else (date, customer, direction) is still read from the file name.
If you do not define any format, the recordings are still processed, but AuditorIA will not be able to fill in those details on its own.
What happens if a file does not match
There is always a file with a name other than the expected one. Choose what to do with those:
- Process it anyway, with default values (recommended): the audio is transcribed all the same. It is assigned the default operator and the remaining details are left empty.
- Skip the file: the audio is not processed. If you later fix the name on the server, it comes in on the next pass.
Step 5 - Save
Click Save. The changes can take a few minutes to take effect: the sync service applies them on its next pass.
What happens next
Once everything is configured, each new recording that shows up in the server folder:
- Is downloaded by the sync service.
- Is assigned to an operator, according to what you defined.
- Enters AuditorIA as one more task: it shows up in Search and work with tasks, it is transcribed and it is left ready to review and audit.
To confirm it is working, wait a few minutes and check whether new tasks appear in that campaign.
Common problems
- The connection test fails: check the address, the port, the user and the password. If the details are correct, ask whoever administers the server whether it allows connections from AuditorIA.
- The test passes but no audio comes in: check the Remote Path, since the test does not verify it. Then confirm with whoever administers your installation that the sync service is running.
- The audio comes in with the wrong operator: check where you told it to take the operator from (file name or folder) and whether the naming format matches your real files.
- Duplicated operators were created: this happens when the names in the files do not match the operators already loaded. Switch to Use existing operators only and review Manage local operators.
- Recordings are missing: if you chose Skip the file, the ones that do not match the format are left out. Fix the name on the server or switch to Process it anyway, with default values.
If your role has access, Analytics > SFTP Service has a panel with the sync service's status. It is useful for checking whether it is running when recordings are not coming in.